
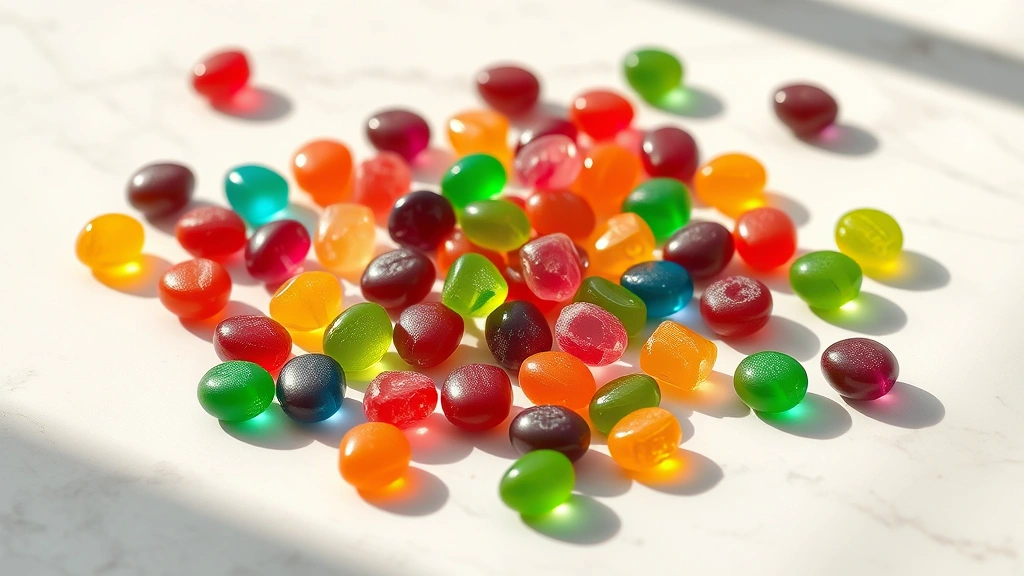
Making hard candy at home is easier than you might think, and the results are absolutely stunning! This classic confection is perfect for gifting, party favors, or simply satisfying a sweet craving. With just a few basic ingredients and a candy thermometer, you’ll create professional-quality hard candies that rival any specialty candy shop.
The beauty of homemade hard candy lies in its versatility. Whether you prefer traditional fruit flavors, sophisticated botanicals, or trendy sour varieties, this recipe serves as your foundation for endless possibilities. The key to success is understanding the importance of temperature control—hard candy requires precision, but once you master this technique, you’ll be making batches regularly.
What makes this recipe truly special is the ability to customize every aspect. You control the flavors, the intensity, and even the colors, ensuring your candies are exactly as you envision them. Plus, homemade hard candies make incredibly thoughtful gifts that show you’ve invested time and care into something special.
If you’re looking to explore more sweet treats and flavor combinations, check out our Best Heavy Cream Alfredo Sauce Recipe for savory-sweet pairing ideas. For complementary confections, our Best Pickled Red Onion Recipe offers interesting flavor contrasts that work beautifully with candy platters. You might also enjoy our Delicious Heavy Cream Pasta Recipe for dinner party planning when you want to serve homemade treats afterward.
For more expert guidance on candy making, I recommend checking out Serious Eats for detailed candy science explanations, and Bon Appétit for innovative flavor combinations. The New York Times Cooking section also features excellent candy-making tutorials from professional pastry chefs.
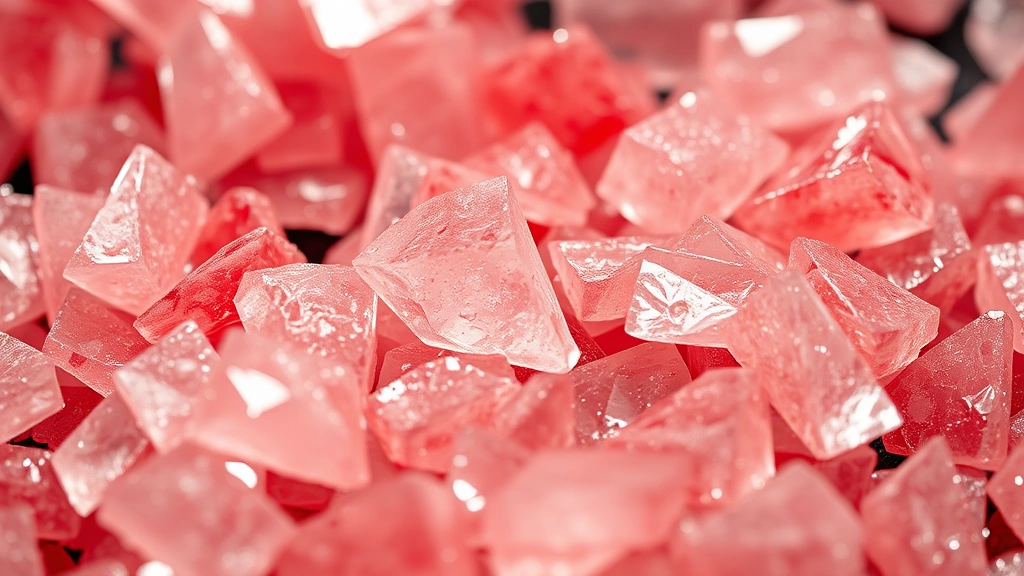
This hard candy recipe yields gorgeous, jewel-like candies with a satisfying snap and smooth texture. Whether you’re a seasoned candy maker or attempting this for the first time, following these instructions carefully will result in professional-quality confections that taste incredible. The process takes about an hour from start to finish, making it perfect for weekend projects or holiday preparation.
Ingredients
- 2 cups granulated sugar
- 3/4 cup light corn syrup
- 3/4 cup water
- 1/4 teaspoon cream of tartar
- 1/2 teaspoon baking soda
- 3-4 teaspoons flavoring oil (fruit, cinnamon, peppermint, or your choice)
- 1/4 teaspoon gel food coloring (optional, but recommended)
- Powdered sugar for dusting (optional)
- Nonstick cooking spray
- 1/4 teaspoon salt
Instructions
- Prepare your workspace by lining a large baking sheet with aluminum foil and spraying it generously with nonstick cooking spray. Have all ingredients measured and ready before you begin, as the cooking process moves quickly once the mixture reaches temperature.
- In a medium saucepan, combine the granulated sugar, light corn syrup, water, and cream of tartar. Stir gently over medium heat until the sugar dissolves completely, about 3-4 minutes. Do not stir vigorously or you risk crystallization.
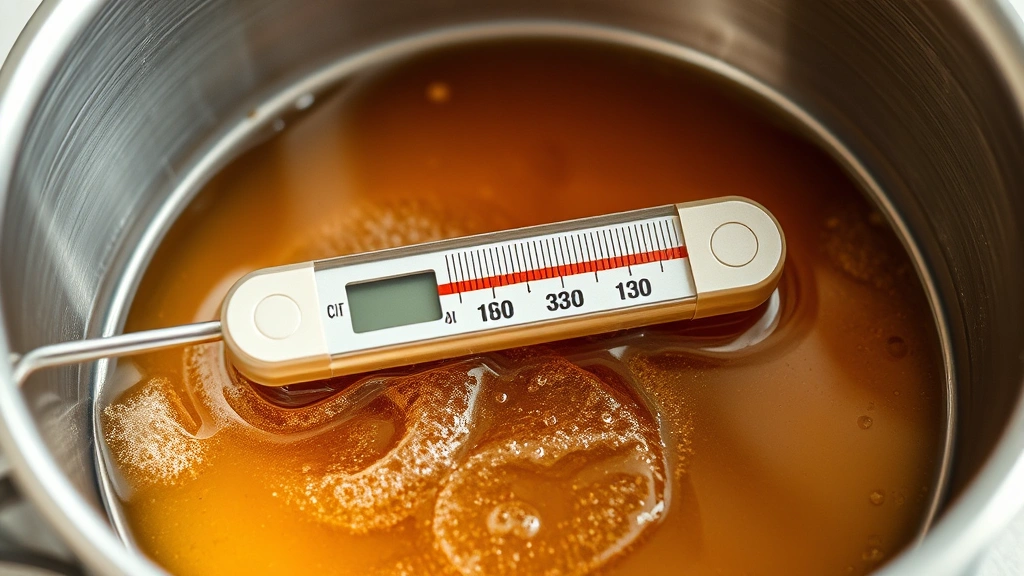
- Once the mixture comes to a boil, stop stirring completely. Insert your candy thermometer, ensuring it doesn’t touch the bottom of the pan. Clip it securely to the side.
- Allow the mixture to cook undisturbed, monitoring the temperature carefully. The candy will gradually change from clear to light amber as it approaches the hard-crack stage at 300-310°F. This typically takes 15-20 minutes depending on your stovetop.
- While the candy cooks, prepare your flavoring and coloring. In a small dish, combine your flavoring oil and gel food coloring if using. The gel coloring will disperse evenly throughout the hot candy better than liquid food coloring.
- When the thermometer reaches exactly 300-310°F (the hard-crack stage), immediately remove the pan from the heat. Working quickly and carefully, add the baking soda and salt, stirring gently. The mixture will bubble up—this is completely normal and creates the slightly porous texture.
- Add your flavoring oil and food coloring mixture, stirring just until combined. Be very careful as the mixture is extremely hot and can cause severe burns. Stir minimally to avoid incorporating too much air.
- Immediately pour the hot candy onto your prepared baking sheet in a thin, even layer. Do not spread it around or attempt to move it once poured—the candy will harden quickly and you may burn yourself.
- Allow the candy to cool completely at room temperature for at least 30-45 minutes. Do not refrigerate or place in the freezer, as this can cause condensation and sticky spots.
- Once completely hardened and cooled, break the candy into bite-sized pieces using your hands or a hard candy mold if you used one. Wear food-safe gloves if desired, as the candy can be sharp.
- Store finished hard candies in an airtight container with parchment paper between layers at room temperature. They’ll keep for several weeks, though homemade versions are best enjoyed within 2-3 weeks for optimal flavor and texture.
Pro Tips
Flavoring Oil vs Extract: Always use candy flavoring oils rather than vanilla extract or other liquid extracts. The high water content in extracts interferes with candy making and can cause crystallization. Flavoring oils are concentrated and heat-stable, making them ideal for this application.
Color Customization: Gel food coloring works best because it’s concentrated and won’t add excess liquid to your mixture. You can create beautiful gradient effects by pouring different colored batches separately or mixing colors for custom shades.
Cream of Tartar Purpose: This ingredient prevents crystallization by interfering with sugar crystal formation. If you don’t have cream of tartar, you can substitute with 1/2 tablespoon of lemon juice or white vinegar, though results may vary slightly.
Baking Soda Reaction: The baking soda creates those tiny air pockets that give hard candy its characteristic slight sparkle and pleasant crunch. Don’t skip this step or reduce the amount, as it’s essential to the texture.
Safety Precautions: Candy cooking involves extremely hot sugar syrup that can cause serious burns. Never touch the candy while it’s hot, keep children away from the cooking area, and wear long sleeves to protect your arms. Have a first aid kit nearby and know that running hot candy burns under cool water immediately is the proper response.
Shaping Options: Pour onto a flat sheet for traditional broken-piece candies, or use silicone candy molds sprayed with nonstick spray for uniform shapes. If using molds, work very quickly as the candy sets rapidly.
Humidity Considerations: Hard candy is sensitive to humidity. On humid days, cook to 305-310°F rather than 300°F to ensure proper hardness. Store in airtight containers with silica packets to maintain crispness.
Flavor Combinations: Try pairing fruit flavors with complementary colors—raspberry with deep red, lemon with bright yellow, or blueberry with royal blue. For sophisticated palates, experiment with floral flavors like lavender or rose, or spice blends like cinnamon-ginger or cardamom.
Troubleshooting Sticky Candy: If your finished candies are sticky, you likely didn’t reach the proper temperature. Recook by dissolving them back into the mixture and trying again. This is completely salvageable.