
Making the perfect pumpkin pie crust is truly an art form, and I’m thrilled to share my foolproof recipe with you today! There’s something so special about a homemade crust – it’s flaky, buttery, and absolutely divine. This isn’t just any pie crust; it’s been perfected over years of baking, testing, and refining every single detail to ensure you get restaurant-quality results right in your own kitchen.
A great pumpkin pie starts with an exceptional crust, and that’s exactly what we’re going to create together. The secret lies in keeping everything cold, working quickly, and understanding the science behind why certain techniques work better than others. I’ve learned that the key to achieving that perfect golden-brown, crispy-on-the-outside, tender-on-the-inside texture is all about the ratio of butter to flour and how you handle the dough.
What makes this recipe special is the addition of a touch of vanilla and a hint of cinnamon right into the crust itself. This subtle flavoring elevates your pie from good to absolutely unforgettable, complementing the pumpkin filling beautifully. Whether you’re making this for Thanksgiving dinner or a cozy autumn gathering, this crust will have everyone asking for your secret.
I always recommend reading through the entire recipe before you start, gathering all your ingredients, and making sure everything is as cold as possible. This is not a recipe to rush through – taking your time is what separates an ordinary crust from an extraordinary one. The good news? Once you master this technique, you’ll be making stunning pies all season long.
For those looking to perfect other autumn recipes, you might also enjoy exploring complementary dessert sauces or rich cream-based recipes that pair beautifully with pumpkin desserts. I also love how this crust technique translates to other applications – check out my pastry fundamentals guide for more baking inspiration.
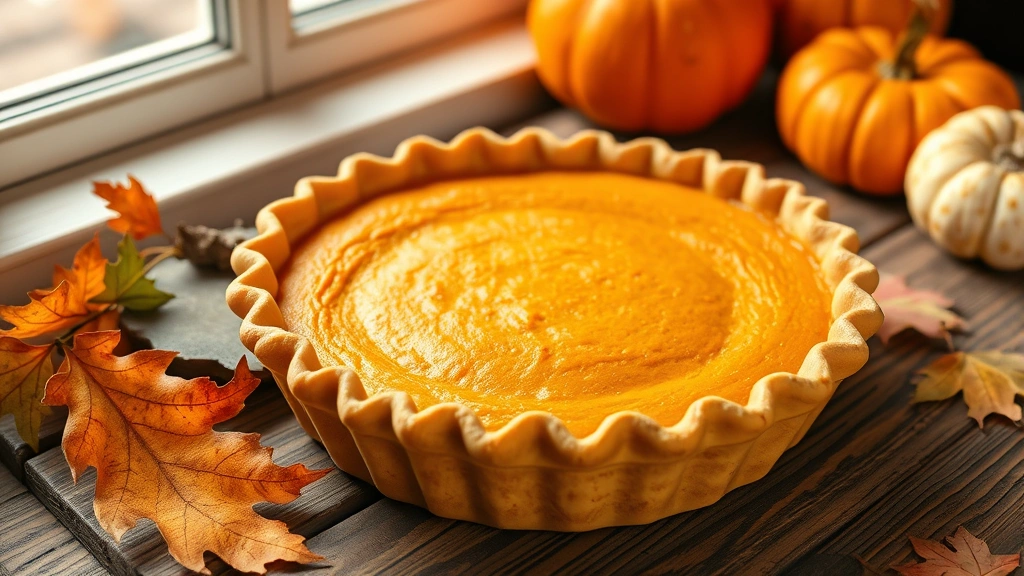
Let me walk you through this step-by-step, and I promise you’ll achieve pie crust perfection. This recipe makes enough for one 9-inch pie with a beautiful, professional-looking crust that will make you proud to serve. The technique I’m sharing has been refined countless times, and I can’t wait for you to experience the difference that proper method and quality ingredients make.
For more detailed baking science, I recommend checking out Serious Eats’ baking guide and New York Times Cooking for additional pie crust variations. You’ll also find wonderful inspiration at Bon Appétit’s dessert section.
Ingredients
- 1 1/4 cups all-purpose flour
- 1/2 teaspoon kosher salt
- 1/2 teaspoon ground cinnamon
- 1/4 teaspoon ground ginger
- 1 tablespoon granulated sugar
- 8 tablespoons (1 stick) unsalted butter, cut into small cubes and chilled
- 3-4 tablespoons ice water
- 1/2 teaspoon vanilla extract
- 1 egg yolk mixed with 1 tablespoon water for egg wash (optional but recommended)
Instructions
- In a medium bowl, whisk together the flour, kosher salt, ground cinnamon, ground ginger, and granulated sugar until well combined. This ensures the spices are evenly distributed throughout the crust rather than clumping together in certain spots.
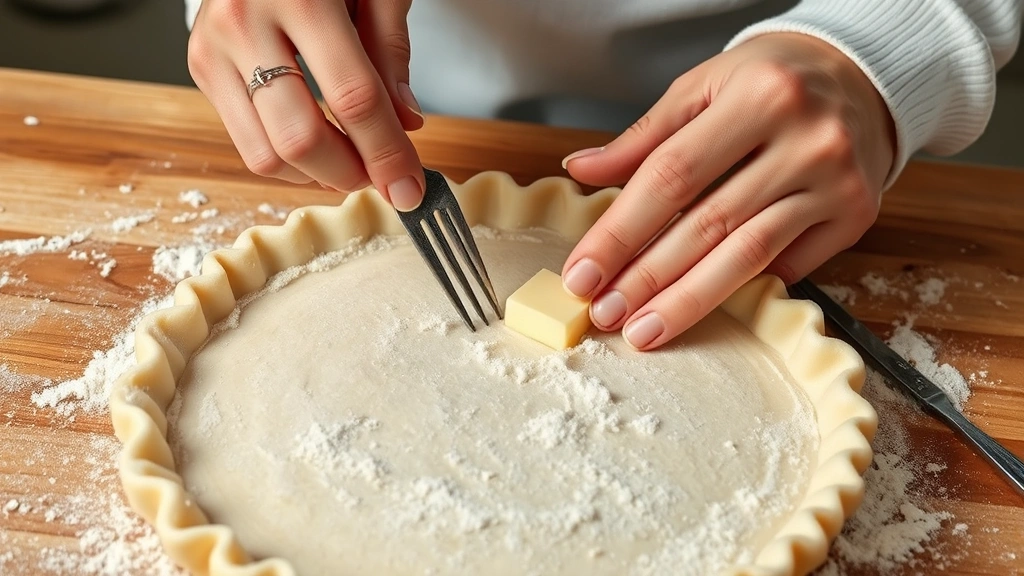
- Add the chilled, cubed butter to the flour mixture and use a pastry cutter, two knives, or your fingertips to work the butter into the flour until the mixture resembles coarse breadcrumbs with some pea-sized pieces of butter remaining throughout.
- In a small bowl, whisk together 3 tablespoons of ice water and the vanilla extract until combined.
- Sprinkle the ice water mixture over the flour-butter mixture, one tablespoon at a time, gently tossing with a fork until the dough just begins to come together. You may need up to 4 tablespoons of water, but add it gradually – you want the dough to be just moistened, not wet.
- Turn the dough out onto a lightly floured surface and gently gather it together with your hands, being careful not to overwork it. You want visible pieces of butter throughout the dough for flakiness.
- Shape the dough into a flat disk about 1/4 inch thick, wrap it in plastic wrap, and refrigerate for at least 1 hour, though overnight is even better.
- When ready to roll out, remove the dough from the refrigerator and let it sit at room temperature for about 5-10 minutes to soften slightly, making it easier to roll without cracking.
- On a lightly floured surface, roll the dough from the center outward, rotating it a quarter turn every few rolls to maintain an even circular shape.
- Continue rolling until the dough is about 1/8 inch thick and approximately 11-12 inches in diameter, which will give you enough to line a 9-inch pie pan with a slight overhang.
- Carefully transfer the rolled dough to your pie pan by rolling it onto your rolling pin and then unrolling it over the pan, or folding it into quarters and unfolding it in the pan.
- Press the dough gently into the bottom and sides of the pie pan, being careful not to stretch it, as this can cause shrinkage during baking.
- Trim the excess dough, leaving about 1 inch overhang around the edges.
- Fold the overhang under itself to create a neat edge and crimp with your fingers or a fork for a decorative finish.
- Place the prepared crust back in the refrigerator for at least 30 minutes before filling, or cover it with plastic wrap and freeze for up to 3 months.
- When ready to bake, preheat your oven according to your pie filling recipe instructions, typically 350-375°F for pumpkin pie.
- If using an egg wash, brush it evenly over the entire crust with a pastry brush for a beautiful golden finish.
- For a blind bake (which many recommend for pumpkin pie to ensure a crispy bottom), line the crust with parchment paper, fill with pie weights or dried beans, and bake at 375°F for 12-15 minutes until set but not browned, then remove weights and continue as directed.

Pro Tips
Do not skip the resting and chilling steps. These allow the gluten to relax, preventing shrinkage, and give the butter time to firm up again after being cut into the flour.
When mixing the dough, aim for a shaggy, barely combined texture. Overmixing develops gluten, which creates a tough, chewy crust rather than the tender, flaky one we’re after.
The spice additions are optional but highly recommended. They add warmth and depth to the crust without overpowering the pumpkin filling.
If cracks appear while rolling, simply patch them with scraps of dough and smooth them out. These imperfections are invisible once the pie is filled and baked.
For a more decorative edge, use a fluted crimper tool or create a rope pattern by pinching the edge between your thumb and forefinger at regular intervals.
If the dough becomes too warm while rolling, return it to the refrigerator for 10-15 minutes before continuing.
This recipe can be doubled and frozen for up to three months. Wrap unbaked crusts tightly in plastic wrap and then aluminum foil for best results.
For blind baking, aluminum pie pans work best as they conduct heat more evenly than glass or ceramic. If using glass, reduce oven temperature by 25 degrees.
The egg wash creates a beautiful golden-brown color and adds a subtle shine. If you prefer not to use egg, a light brushing of milk or cream works wonderfully too.