
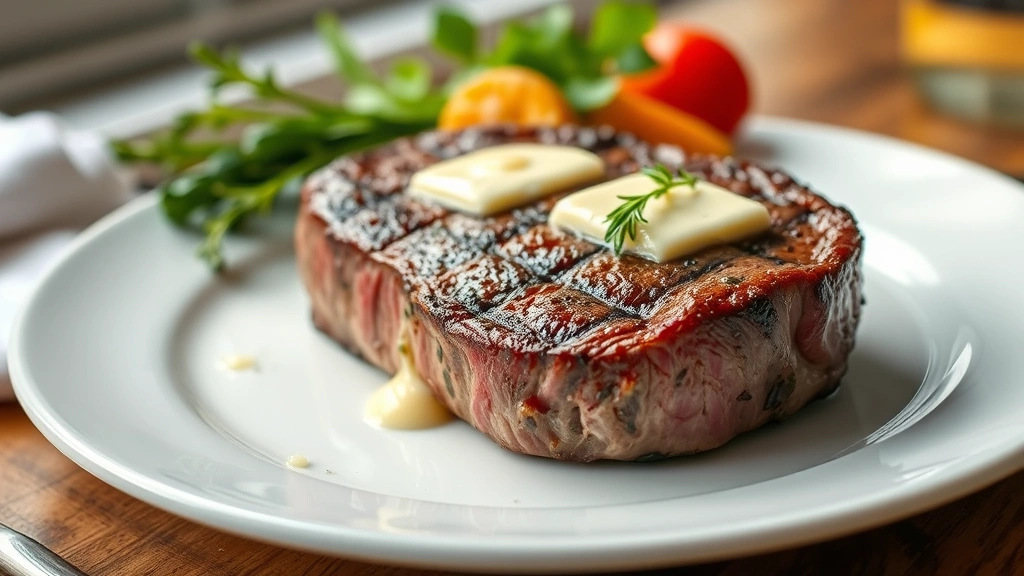
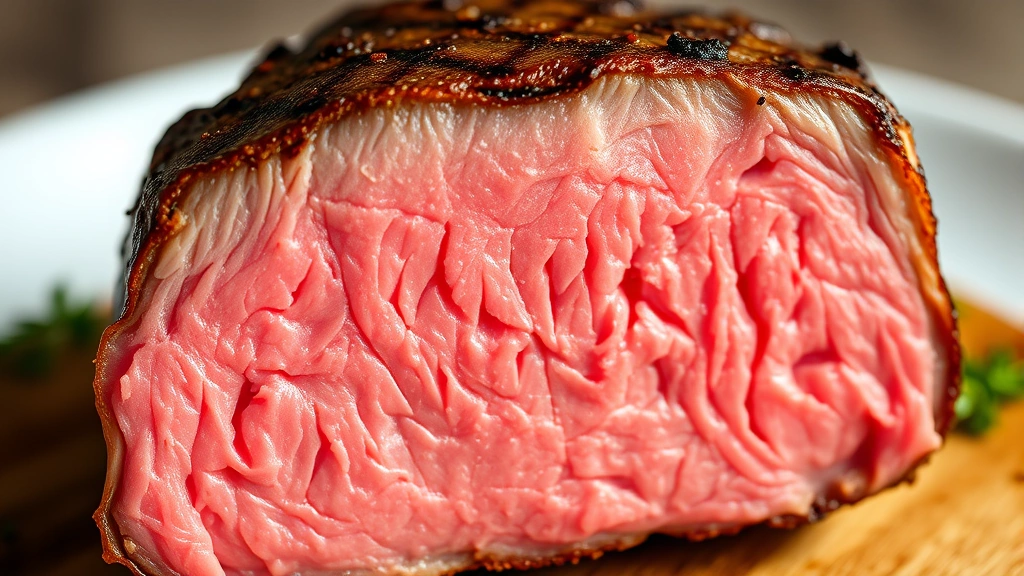
The reverse sear method is an absolute game-changer for achieving restaurant-quality steaks at home. This technique involves slowly cooking your steak in a low-temperature oven until it reaches your desired doneness, then finishing it with a quick, high-heat sear in a cast iron skillet. The result? A perfectly cooked steak with an even, rosy-pink center and a beautiful, caramelized crust that rivals any steakhouse.
What I absolutely love about the reverse sear technique is how forgiving it is. Unlike traditional searing, where timing is everything, this method gives you a generous window of time to achieve perfect doneness. You’re in complete control, which means no more overcooked exteriors or disappointing gray rings around the edges. The low and slow oven cooking ensures that your steak heats evenly from edge to edge, creating that coveted edge-to-edge pink center that steakhouse chefs spend years perfecting.
I’ve been making steaks this way for years now, and I’ve perfected every detail—from selecting the right cut to nailing the final sear. This method works beautifully with premium cuts like ribeyes, New York strips, and filets, though I find it’s especially magical with thicker cuts (1.5 to 2 inches). The beauty of reverse searing is that it’s actually easier than traditional methods, requiring less active cooking time and far less stress.
One of my favorite things about this recipe is that you can prepare everything ahead of time. Season your steaks in the morning, let them sit in the fridge, and you’re ready to cook a restaurant-quality dinner whenever you want. Pair this with our Best Longhorn Brussel Sprouts Recipe or our Best Broccoli Slaw Dressing Recipe for an absolutely stunning dinner spread. For something lighter, our Best Macaroni Salad Recipe makes a wonderful side. If you’re looking for more indulgent options, check out our Delicious Heavy Cream Pasta Recipe or Easy Manicotti Recipe for a complete meal.
Let me walk you through this foolproof method that will have your dinner guests asking for your secret. I’ve tested this technique with different oven temperatures and cooking times, and I’m sharing exactly what works best. Ready to make the perfect steak? Let’s get started!
For more detailed steak cooking techniques, check out Serious Eats’ comprehensive guide or Bon Appétit’s reverse sear tutorial. For temperature guidance, The New York Times cooking section offers excellent insights into achieving perfect doneness every time.
Ingredients
- 2 ribeye or New York strip steaks (1.5 to 2 inches thick)
- 2 teaspoons kosher salt
- 1 teaspoon freshly ground black pepper
- 1/2 teaspoon garlic powder
- 1/4 teaspoon onion powder
- 2 tablespoons unsalted butter
- 3 sprigs fresh thyme
- 3 cloves garlic, smashed
- 2 tablespoons high-heat cooking oil (avocado or vegetable)
- 1/4 teaspoon fleur de sel (finishing salt)
Instructions
- Remove your steaks from the refrigerator 15 minutes before cooking. Pat them completely dry with paper towels—this is crucial for getting a good crust.
- While the steaks come to room temperature, preheat your oven to 275°F. Make sure your oven rack is positioned in the center.
- Season both sides of the steaks generously with kosher salt, pepper, garlic powder, and onion powder. Use your hands to gently press the seasonings into the meat.
- Place a wire rack on a rimmed baking sheet and arrange the seasoned steaks on top, making sure they’re not touching.
- Insert a meat thermometer into the center of one steak, making sure it doesn’t touch bone if you have a bone-in cut.
- Place the baking sheet in the preheated 275°F oven and cook until the steaks reach an internal temperature of 110-115°F for medium-rare (about 25-35 minutes depending on thickness).
- Remove the steaks from the oven and let them rest on the wire rack for 5 minutes. The temperature will rise slightly as they rest.
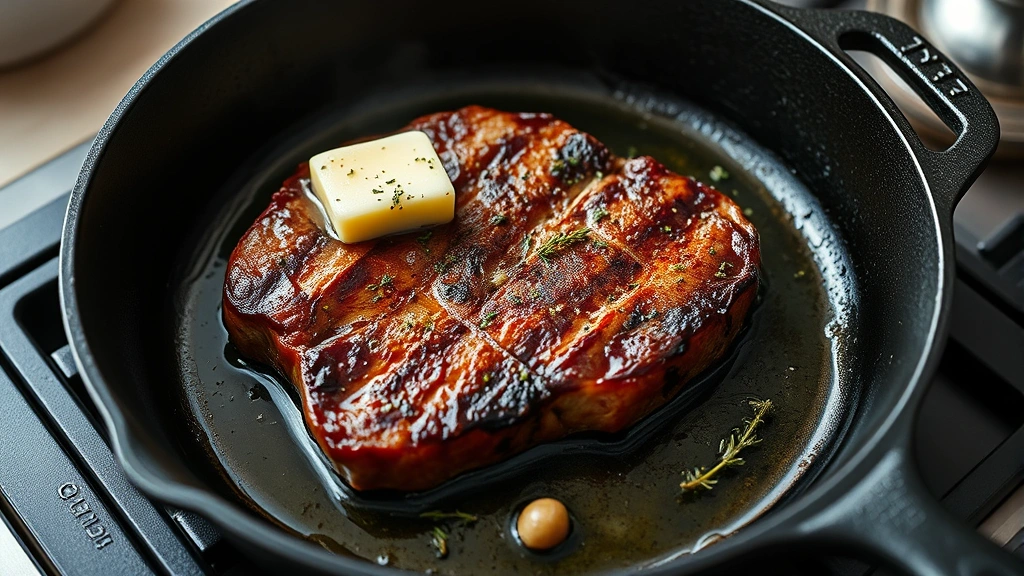
- While the steaks rest, place a cast iron skillet over medium-high heat and let it get smoking hot (about 2-3 minutes).
- Add the high-heat cooking oil to the hot skillet and swirl to coat evenly.
- Carefully place the steaks in the skillet and sear for 60-90 seconds on the first side without moving them. You want a deep, golden-brown crust.
- Flip the steaks and sear the other side for another 60-90 seconds.
- Add the butter, thyme sprigs, and smashed garlic cloves to the skillet.
- Tilt the skillet and baste the steaks with the melted, foamy butter for about 30 seconds on each side.
- Transfer the steaks to a cutting board and immediately sprinkle with fleur de sel.
- Let the steaks rest for 5 minutes before serving. This allows the juices to redistribute throughout the meat, ensuring maximum tenderness and juiciness.
Pro Tips
- The reverse sear method is all about low, slow, even cooking followed by a quick, hot sear. This combination gives you edge-to-edge perfect doneness with a gorgeous crust.
- Thickness matters tremendously. I recommend using steaks that are at least 1.5 inches thick. Thinner steaks won’t benefit as much from this method because they cook too quickly in the oven.
- Always use a meat thermometer. Cooking by time alone is unreliable because every oven varies. For medium-rare, aim for 110-115°F in the oven, knowing it will rise to about 130°F after resting and searing.
- Pat your steaks completely dry before seasoning. Any moisture on the surface will create steam, which prevents browning. I typically let them sit uncovered in the fridge for 24 hours before cooking.
- Don’t skip the resting period after oven cooking. Those few minutes allow carryover cooking to finish and let the meat relax before the final sear.
- Your skillet must be smoking hot before the steaks go in. A properly heated cast iron skillet is essential for achieving that restaurant-quality crust. If it’s not hot enough, you’ll steam the steak instead of searing it.
- Basting with butter, garlic, and thyme during the final sear adds incredible flavor. That foamy butter coating is what gives steakhouse steaks their luxurious taste.
- Fleur de sel is my finishing salt of choice because the crystals are larger and add a delightful texture. Regular kosher salt works too, but the texture won’t be quite the same.
- This method works beautifully for cooking multiple steaks. Just arrange them on the wire rack without touching, and extend the oven time by about 10 minutes.
- Room temperature steaks cook more evenly than cold ones. Take them out of the fridge 15-20 minutes before cooking.
- Store any leftovers in an airtight container in the refrigerator for up to 3 days. Reheat gently in a 275°F oven until warmed through.