

There’s something utterly special about a perfectly roasted rump roast—it’s the kind of elegant yet approachable dish that makes you look like a culinary genius, even though the technique is surprisingly simple. This classic cut of beef becomes incredibly tender and flavorful when treated with respect and a bit of patience. The key to achieving that beautiful golden crust and perfectly pink center lies in understanding your oven temperature, giving the meat proper seasoning time, and most importantly, allowing it to rest before carving.
Rump roast is one of those wonderful cuts that sits at the intersection of affordability and impressive presentation. It’s leaner than rib or prime rib, which means it requires a slightly different approach, but when you nail it, the results are absolutely stunning. The exterior develops this gorgeous mahogany crust while the interior remains juicy and tender, and the aroma that fills your kitchen during cooking is nothing short of intoxicating.
What I love most about this recipe is its versatility. You can dress it up with fresh herbs like thyme and rosemary, or keep it simple with just salt, pepper, and quality butter. Serve it alongside classic French techniques for your vegetables, or go more casual with roasted potatoes and Yorkshire puddings. The beauty of a rump roast is that it adapts beautifully to whatever occasion you’re celebrating.
I’ve spent years perfecting this technique, testing everything from different oven temperatures to various resting periods, and I’m thrilled to share my foolproof method with you. This isn’t complicated cooking—it’s just smart cooking. According to Serious Eats, understanding the science behind meat temperature and resting is crucial, and I absolutely agree. Once you master this basic rump roast, you’ll find yourself making it again and again for dinner parties, Sunday family gatherings, and special celebrations.
The preparation is minimal but intentional. You’ll want to bring your meat to room temperature before roasting—this ensures even cooking throughout. Season generously with sea salt and freshly ground black pepper, then sear it in a hot pan to develop that gorgeous crust. From there, it’s into the oven where the magic happens. The low-and-slow approach ensures the interior cooks gently while the exterior continues to develop flavor and color.
Whether you’re a seasoned home cook or someone who’s intimidated by cooking a large piece of meat, this recipe is designed to give you confidence. I’ve included detailed instructions for checking doneness, tips for achieving the perfect crust, and guidance on how long to rest your roast for maximum juiciness. By the time you slice into this beautiful piece of beef, you’ll understand exactly why rump roast has remained a beloved centerpiece for generations of home cooks.
Ingredients
- 1 beef rump roast, 3 to 4 pounds, at room temperature
- 3 tablespoons kosher sea salt, plus more to taste
- 2 tablespoons freshly ground black pepper
- 4 tablespoons unsalted butter, divided
- 2 tablespoons extra virgin olive oil
- 6 fresh thyme sprigs
- 4 fresh rosemary sprigs
- 4 cloves garlic, smashed
- 1 medium yellow onion, quartered
- 2 carrots, cut into 2-inch pieces
- 1 cup beef broth or stock
- 1/2 cup red wine (optional but recommended)
- 2 bay leaves
- 1 teaspoon Dijon mustard
Instructions
- Remove your rump roast from the refrigerator 45 minutes to 1 hour before cooking. This allows the meat to come to room temperature, which ensures even cooking throughout the roast. While you wait, preheat your oven to 325 degrees Fahrenheit (163 degrees Celsius).
- Pat the rump roast completely dry using paper towels. Moisture on the surface will prevent proper browning and crust development. Don’t skip this step—it makes a significant difference in your final result.
- Generously coat all sides of the roast with the kosher sea salt and freshly ground black pepper. Be liberal with your seasoning; the exterior seasons the entire roast as it cooks. Press the seasonings firmly into the meat so they adhere properly.
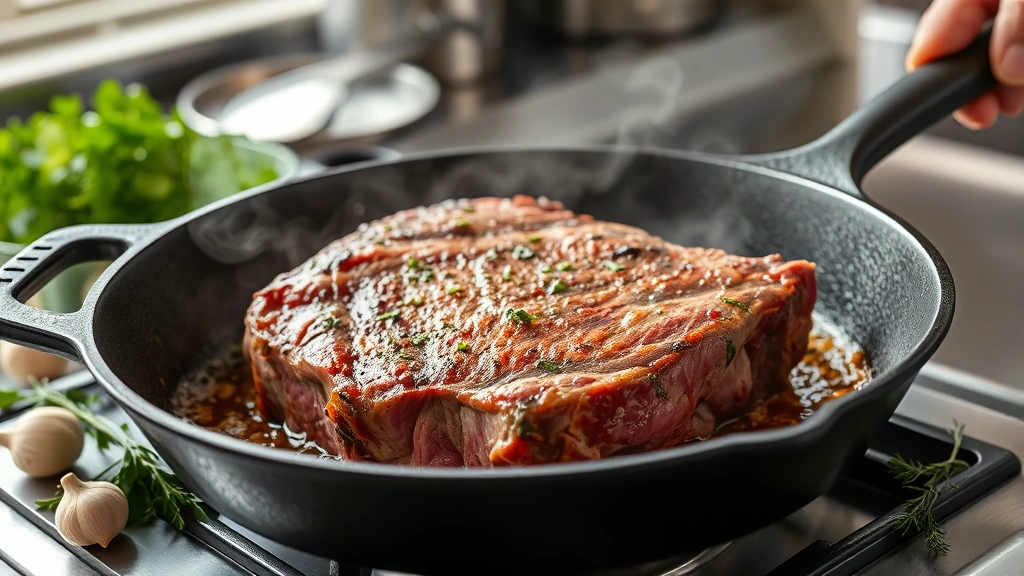
- Heat a large oven-safe skillet or Dutch oven over medium-high heat. Add the olive oil and let it shimmer until it’s almost smoking. This indicates the pan is hot enough to create a proper sear.
- Carefully place the seasoned rump roast into the hot pan. Do not move it for 3-4 minutes—you want to develop a deep golden-brown crust. This is called the Maillard reaction, and it adds incredible flavor to your roast.
- Using tongs, turn the roast and sear each remaining side for 3-4 minutes until all surfaces are beautifully browned. Work methodically around the roast, including the ends. This entire searing process should take about 15-20 minutes total.
- Remove the roast from the pan and set it aside on a clean cutting board. Reduce the heat to medium, then add 2 tablespoons of butter to the same skillet.
- Add the smashed garlic cloves, thyme sprigs, and rosemary sprigs to the pan. Stir constantly for about 1-2 minutes until the herbs become fragrant. This creates an aromatic base for your pan sauce.
- Add the quartered onion and carrot pieces to the herb mixture. Stir everything together and let it cook for another 2-3 minutes, stirring occasionally, until the vegetables begin to soften slightly.
- Pour in the beef broth and red wine, stirring to combine with all the browned bits on the bottom of the pan. These browned bits, called fond, contain incredible flavor. Scrape them up with a wooden spoon to incorporate them fully.
- Add the bay leaves, then place the seared rump roast back into the skillet, nestling it among the vegetables and herbs. The roast should be partially surrounded by the liquid and vegetables.
- Top the roast with 2 tablespoons of fresh butter, breaking it into pieces and distributing it over the surface. This will baste the meat as it cooks and help keep the exterior from drying out.
- Transfer the skillet to your preheated 325-degree oven. Roast for approximately 1 hour and 15 minutes for medium-rare doneness (internal temperature of 130-135 degrees Fahrenheit). For medium, aim for 135-145 degrees Fahrenheit. Add 15-20 minutes for medium-well if preferred.
- Check the internal temperature using a meat thermometer inserted into the thickest part of the roast, not touching bone. This is the most accurate way to determine doneness. Check starting at the 1-hour mark, then every 10 minutes until you reach your desired temperature.
- Once the roast reaches your target temperature, carefully remove it from the oven and the skillet. Place it on a warm cutting board and tent it loosely with aluminum foil. This resting period is absolutely crucial—do not skip it.
- Let the roast rest for 15-20 minutes. During this time, the residual heat continues to cook the interior slightly while the juices redistribute throughout the meat. Resting prevents those juices from running all over your plate when you carve.
- While the roast rests, prepare your pan sauce. Strain the cooking liquid through a fine-mesh sieve into a saucepan, pressing on the solids to extract all the liquid. Discard the solids or save the vegetables if desired.
- Place the strained liquid over medium heat and bring it to a gentle simmer. Whisk in the Dijon mustard until well combined. Taste and adjust seasoning with additional salt and pepper as needed.
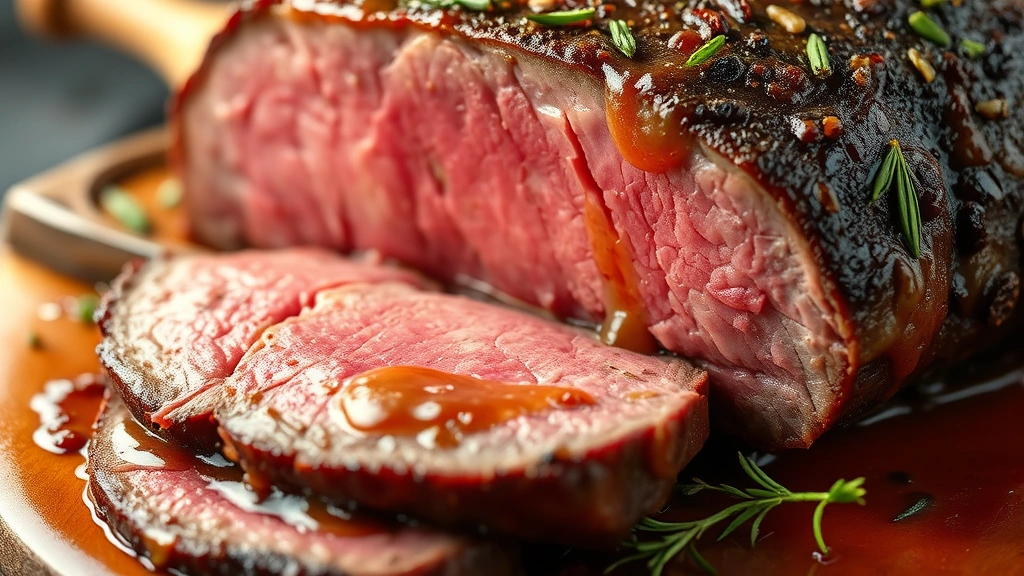
- Carve your rump roast into quarter-inch thick slices using a sharp carving knife. Cut against the grain for maximum tenderness. The meat should be a beautiful pink in the center with a golden-brown exterior.
- Arrange the carved roast on a serving platter and drizzle with your prepared pan sauce. Serve immediately while warm, accompanied by your choice of sides and additional sauce on the side.
Pro Tips
Invest in a Quality Meat Thermometer: An instant-read meat thermometer removes all guesswork from cooking. The difference between overdone and perfectly cooked can be just a few minutes, and a good thermometer ensures you hit your target every single time.
Don’t Skip the Searing Step: The initial searing in a hot pan is what creates that beautiful mahogany crust and develops deep, savory flavors through the Maillard reaction. This step is non-negotiable for the best possible result.
The Resting Period is Not Optional: Allowing the roast to rest after cooking allows the juices to redistribute throughout the meat. Cutting into it immediately will cause all those delicious juices to run onto your plate instead of staying in the meat.
Use Fresh Herbs When Possible: Fresh thyme and rosemary provide so much more flavor than dried herbs. If you only have dried herbs available, use one-third the amount and add them to the pan later in the cooking process.
Pan Sauce Adds Incredible Flavor: The liquid in the pan captures all the flavors from the roast, vegetables, and herbs. This creates an elegant sauce that requires minimal effort but adds significant sophistication to your presentation.
Leftover Rump Roast Ideas: Cold sliced rump roast makes exceptional sandwiches the next day. You can also shred any leftovers and use them in salads, grain bowls, or hearty soups. Store covered in the refrigerator for up to four days.
Wine Selection Matters: A decent red wine makes a difference in your pan sauce. You don’t need an expensive bottle, but avoid anything you wouldn’t drink yourself. The wine reduces and concentrates, so quality matters.
Adjust Cooking Time Based on Size: The cooking time provided is for a 3-4 pound roast. Larger roasts may need an additional 15-20 minutes, while smaller roasts might be done 10-15 minutes earlier. Always use a meat thermometer rather than relying solely on time.
Vegetable Sides Pair Beautifully: Consider serving your rump roast with roasted root vegetables, creamed spinach, or traditional Yorkshire puddings. The elegance of the roast deserves equally special sides.