
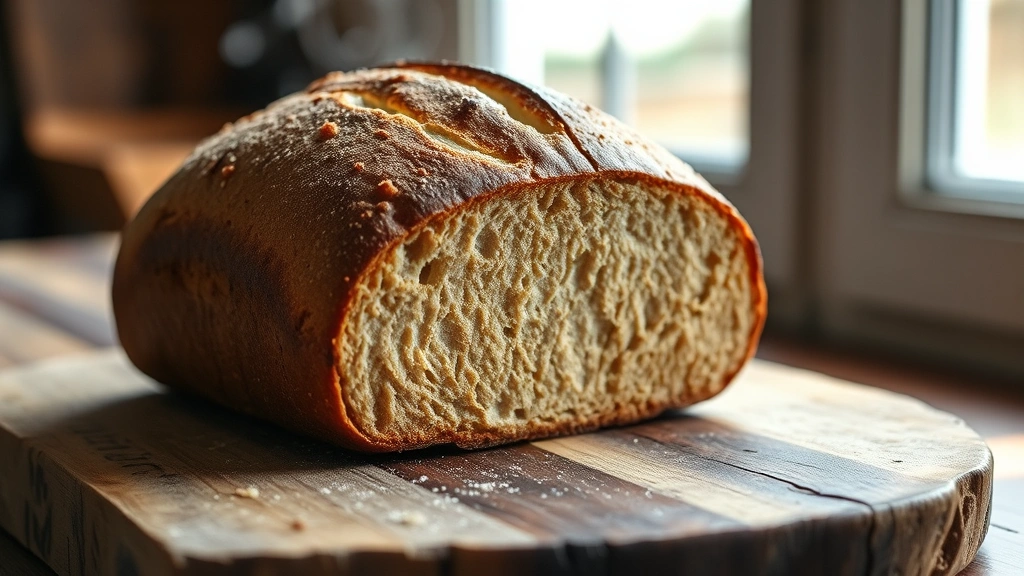
There’s something truly magical about pulling a warm, crusty loaf of rye sourdough from the oven. The deep, earthy flavors and gorgeous open crumb structure make this bread absolutely irresistible. This comprehensive guide will walk you through creating the perfect rye sourdough at home, even if you’ve never baked bread before.
Rye sourdough is a beautiful intersection of traditional baking and modern technique. Unlike regular wheat sourdough, rye brings a distinctive flavor profile—slightly nutty, with subtle hints of cocoa and earthiness—that elevates every slice. The natural fermentation process not only develops these complex flavors but also makes the bread more digestible and gives it an impressive shelf life.
What makes this recipe special is the combination of a robust sourdough starter with the unique properties of rye flour. Rye contains different gluten structures than wheat, which means your dough will behave differently, but the results are absolutely worth mastering. The crumb tends to be tighter than pure wheat sourdough, but that’s part of its charm—it creates the perfect structure for holding toppings and makes for excellent sandwiches.
I recommend starting with a well-maintained sourdough starter that’s at least a week old and doubling reliably within 4-8 hours of feeding. If you don’t have one yet, creating a starter is easier than you think and takes about 5-7 days.
For deeper understanding of fermentation science, check out Serious Eats’ comprehensive sourdough guide and Bon Appétit’s beautiful sourdough techniques.
The beauty of rye sourdough is that it’s forgiving—rye’s high enzymatic activity means the dough stays workable longer, giving you flexibility in your schedule. Whether you’re a morning baker or prefer working late into the evening, this recipe adapts to your rhythm.
Perfecting your rye sourdough takes practice, but each loaf teaches you something new. You’ll learn to read your dough, understand fermentation, and develop an intuition for when everything is just right. The payoff is extraordinary—a loaf that rivals anything from a professional bakery, made entirely in your own kitchen with just four simple ingredients.
Ingredients
- 500g bread flour (or all-purpose flour)
- 150g rye flour (medium or dark rye)
- 350ml filtered water (room temperature)
- 100g active sourdough starter (fed 4-6 hours prior, at peak)
- 10g sea salt
- Extra rye flour for dusting

Instructions
- Prepare your workspace and gather all ingredients. Ensure your sourdough starter is active and bubbly, doubling in volume within 4-6 hours of its last feeding. If your starter is sluggish, feed it and wait another 4-8 hours before beginning.
Mix your flours together in a large bowl. Combine 500g bread flour and 150g rye flour, whisking together to distribute the rye evenly throughout.
- Create your dough by combining 350ml room temperature water with your 100g active sourdough starter in a separate bowl. Stir well until the starter is mostly dissolved in the water.
Pour the wet mixture into your flour mixture, stirring with a wooden spoon or dough whisk until all flour is incorporated and you have a shaggy dough. Make sure there are no dry flour pockets remaining.
- Let the dough rest for 30-60 minutes in an autolyse phase. This resting period allows the flour to fully hydrate and gluten to begin developing naturally. Cover the bowl with a damp kitchen towel or plastic wrap to prevent surface drying.
- After the autolyse rest, add 10g sea salt to your dough. Wet your hand and pinch the salt into small portions, distributing it throughout the dough as you mix. Incorporate the salt fully using a pinching and folding motion, working it in completely until evenly distributed and the dough becomes more cohesive.
At this point, your dough should feel slightly tacky but manageable. Rye dough is naturally stickier than wheat dough, so this is normal.
- Begin bulk fermentation by performing a series of stretch and folds every 30 minutes for the first 2 hours. Wet your hand lightly, grab one side of the dough, stretch it up and fold it over the center. Rotate the bowl 90 degrees and repeat, completing 4 folds per session.
These folds build strength in your dough and are especially important with rye, which has weaker gluten networks than pure wheat.
- After your initial 2 hours of stretch and folds (4 sets total), let the dough rest undisturbed for the remaining 10-14 hours of bulk fermentation. The exact time depends on your room temperature—warmer rooms (72-75°F) will ferment faster (10-12 hours), while cooler rooms (68-70°F) need 12-16 hours.
Your dough should increase in volume by about 50-75% and show visible bubbles throughout when you gently open it up. The surface should look slightly domed.
- Prepare your banneton basket or bowl by lining it heavily with rye flour. This prevents sticking and is crucial with rye dough, which is stickier than wheat dough.
Dump your fermented dough onto a lightly floured work surface. Handle it gently to preserve the gas bubbles you’ve worked so hard to develop.
- Shape your dough using a gentle pre-shaping technique. Pull the edges of the dough toward the center, creating tension on the surface. Let it rest for 20-30 minutes on the bench. This intermediate rest allows the gluten to relax before final shaping.
- Perform your final shape by flipping the dough seam-side down and gently pulling it toward you to create surface tension. Work carefully—overhandling will deflate your beautiful fermentation.
Turn the dough seam-side up and place it into your floured banneton basket. The seam (rough side) should face up.
- Cold retard your shaped dough by placing the banneton in the refrigerator for 8-16 hours. This overnight rest develops flavor dramatically and makes scoring easier. The cold dough is also easier to handle and less likely to over-proof during baking.
If you prefer a quicker bake, you can do a 2-4 hour room temperature final proof instead, watching carefully for about 50% rise and a slight jiggle when gently poked.
- Place your Dutch oven or covered baking vessel in the oven and preheat to 500°F (260°C) for at least 45 minutes. High heat and steam are essential for developing a beautiful crust and oven spring.
About 15 minutes before baking, remove your dough from the refrigerator to bring it to baking temperature.
- Score your dough using a sharp bread lame or clean razor blade. Cut a single long slash at a 30-45 degree angle, about ¼ inch deep. Rye sourdough doesn’t need elaborate scoring—a simple cut directs the expansion beautifully.
Carefully turn your dough seam-side down onto parchment paper for easy transfer.
- Transfer your dough to the preheated Dutch oven by carefully sliding the parchment paper with your shaped dough inside. Cover with the Dutch oven lid and bake at 500°F (260°C) for 20 minutes.
This covered baking time traps steam, which creates the gorgeous crust and allows for maximum oven spring.
- Remove the Dutch oven lid and reduce heat to 450°F (232°C). Bake for an additional 15-20 minutes until the loaf is deeply golden brown. Your rye sourdough should have a rich, dark mahogany color—rye naturally browns more than wheat bread.
Look for caramelized edges and a loaf that sounds hollow when tapped on the bottom (internal temperature should reach 205-210°F).
- Cool your finished loaf on a wire rack for at least 1-2 hours before slicing. This cooling time is crucial—the interior continues to set during cooling, and cutting too early results in a gummy crumb.
Resist the temptation to slice immediately, I know it’s hard! The wait ensures perfect texture and sliceability.

Pro Tips
- Sourdough Starter Health: Your starter should be active and bubbly, showing visible bubbles and doubling in volume within 4-6 hours of feeding. A sluggish starter will result in underproofed bread with dense crumb. If your starter seems slow, feed it with equal parts flour and water by weight for 2-3 consecutive days before attempting this recipe.
- Rye Flour Types: Medium rye flour creates a lighter crumb with subtle flavor, while dark rye produces deeper color and more pronounced earthy notes. I recommend starting with medium rye if this is your first rye sourdough. For authentic flavor, seek out specialty rye flours from boutique flour mills.
- Water Temperature: Room temperature (65-75°F) water is ideal. Cold water slows fermentation dramatically, while warm water accelerates it. If your kitchen is particularly cold, you can use slightly warmer water (up to 80°F) to maintain proper fermentation pace.
- Bulk Fermentation Timing: The 50-75% volume increase is your guide, not strict timing. A poke test helps confirm readiness—gently poke the dough with a floured finger. If the indentation slowly springs back halfway, you’re ready to shape. If it springs back completely, fermentation needs more time.
- Shaping Technique: Rye dough is naturally slack and sticky. Keep your hands wet rather than floured for shaping—this prevents excess flour incorporation and makes handling easier. Work with confidence and speed; hesitation leads to sticking.
- Cold Retard Benefits: The overnight refrigeration is transformative. It develops complex flavors, makes scoring easier, and dramatically improves your crumb structure. You can retard for up to 48 hours if needed.
- Oven Spring: Rye bread typically shows less dramatic oven spring than pure wheat sourdough, but you’ll still see significant expansion in the first 15 minutes. This is normal and expected.
- Crust Development: The deep color of rye sourdough comes from natural pigments and Maillard reaction, not over-baking. This darker color is desired and contributes to the distinctive rye flavor.
- Storage: Keep cooled loaves in a paper bag at room temperature for 3-4 days. For longer storage, slice and freeze in an airtight container for up to 2 months. Rye bread stays fresher longer than wheat bread due to its lower gluten content and higher enzyme activity.
- Troubleshooting Dense Crumb: Usually indicates underproofing or weak fermentation. Extend bulk fermentation time or ensure your starter is truly active and vigorous. Dense crumb can also result from too much salt or insufficient gluten development during stretch and folds.
- Troubleshooting Gummy Interior: Results from cutting too soon after baking. Allow full cooling time. If still gummy after 2 hours, your oven temperature may be inaccurate—use an oven thermometer to verify.
- Hydration: This recipe uses approximately 70% hydration, which is standard for rye sourdough. Higher hydration (75%+) creates open crumb but requires more advanced handling skills. Lower hydration (65-68%) produces denser bread.