
Making authentic Sicilian pizza dough is easier than you think, and once you master this foolproof recipe, you’ll never go back to store-bought! This traditional dough creates that signature thick, airy, focaccia-like crust with crispy edges and a tender, pillowy interior that Sicilians have perfected over generations. The secret lies in the high hydration ratio, the quality of your ingredients, and a long, cold fermentation that develops incredible flavor and texture.
Sicilian pizza, also known as sfincione or al taglio, originated in Palermo and is characterized by its rectangular shape and generous thickness. Unlike Neapolitan pizza, which is thin and delicate, Sicilian pizza is bold, sturdy, and designed to be eaten by the slice. The dough itself is relatively forgiving for beginners because the thick canvas gives you plenty of room for error, and the generous hydration makes it easier to work with than you might expect.
What makes this recipe so special is the balance of technique and time. We’re using a combination of all-purpose flour and bread flour to develop enough gluten structure while maintaining tenderness. The long fermentation—both bulk and cold—allows the dough to develop complex flavors and creates those beautiful air pockets that make each bite satisfying. This isn’t a quick pizza dough; it’s a labor of love that rewards patience with restaurant-quality results.
This recipe is perfect for hosting a casual pizza night with friends or impressing your family with homemade pizza that tastes like it came straight from a Palermo pizzeria. You can prep the dough days in advance and bake whenever you’re ready, making it incredibly convenient for entertaining. The dough also freezes beautifully, so you can always have authentic Sicilian pizza at your fingertips. Pair your finished pizza with pickled red onions or a fresh chickpea salad for a complete Sicilian feast.
I’ve tested this dough countless times, and I’m confident that following these steps will give you exceptional results. The key is not to rush—let the dough develop naturally, and don’t be intimidated by the wet dough. It might seem sticky at first, but that’s exactly what you want. Trust the process, and you’ll be rewarded with authentic Sicilian pizza that’ll make you feel like you’re dining al fresco in the streets of Palermo. For more pasta inspiration, check out our bacon carbonara recipe for another Italian classic.
Ingredients
- 3 cups (360g) all-purpose flour
- 1 cup (120g) bread flour
- 1½ teaspoons (9g) fine sea salt
- ½ teaspoon (3g) instant yeast
- 1¼ cups (300ml) room temperature water
- 2 tablespoons (30ml) extra virgin olive oil, plus more for the pan
- 1 tablespoon (15ml) honey or sugar
Instructions
- In a large mixing bowl, whisk together the all-purpose flour, bread flour, and sea salt until evenly combined. Create a small well in the center of the dry ingredients.
- In a separate small bowl, dissolve the instant yeast in the room temperature water and let it sit for 1 minute. Add the honey or sugar to the yeast mixture and stir gently to combine.
- Pour the yeast mixture into the well of the flour, and using your fingers or a wooden spoon, begin incorporating the flour into the liquid. Mix until a shaggy dough forms and there are no dry pockets of flour remaining.
- Add the extra virgin olive oil to the dough and mix it in thoroughly using your hands or a wooden spoon. The dough will be quite wet and sticky—this is intentional and correct.
- Cover the bowl with plastic wrap or a damp kitchen towel and let the dough rest at room temperature for 30 minutes. This is called the autolyse and allows the flour to fully hydrate.
- After the autolyse, perform the first set of stretches and folds: wet your hand with water, grab one side of the dough, stretch it up and fold it over the center. Rotate the bowl 90 degrees and repeat. Do this 4 times total, rotating the bowl between each fold.
- Cover the bowl again and let it rest for 30 minutes at room temperature. Perform another set of 4 stretches and folds as described in the previous step.
- Repeat this process one more time: rest for 30 minutes, then perform 4 more stretches and folds. You should have done three sets of stretches and folds total, each separated by 30 minutes of rest.
- After the final set of stretches and folds, cover the bowl and let the dough bulk ferment at room temperature for 2-3 hours, until it has increased in volume by about 50-75%. The dough should look puffy and feel airy when you gently poke it.
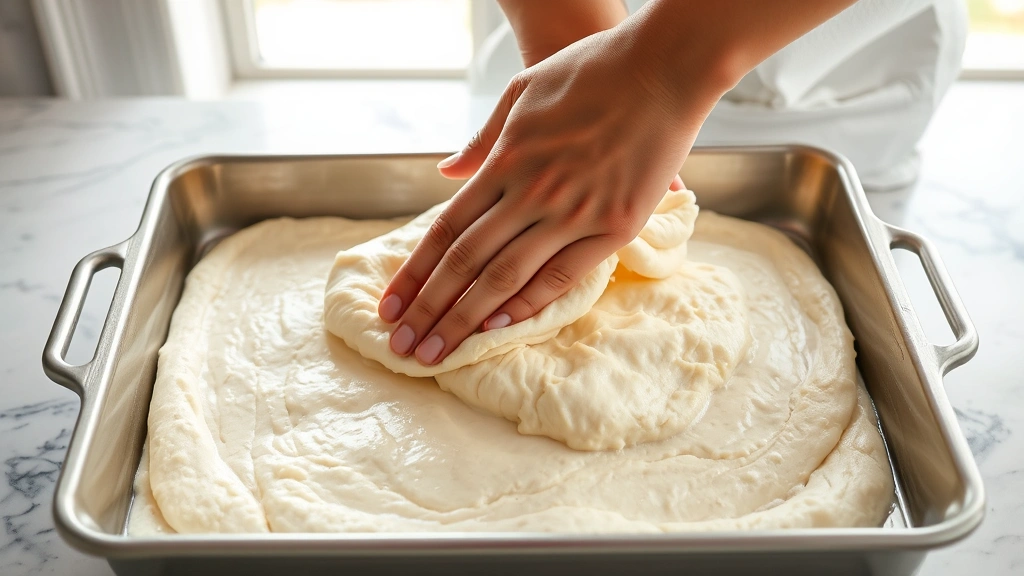
- Once bulk fermentation is complete, turn the dough out onto a lightly oiled work surface. Using your hands or a bench scraper, gently shape the dough into a loose rectangle, being careful not to deflate it too much.
- Lightly oil a 16×12 inch (or similar rectangular) baking pan or sheet pan. Transfer the shaped dough to the oiled pan.
- Cover the pan loosely with plastic wrap and refrigerate for at least 24 hours, preferably 48-72 hours. This cold fermentation period is crucial for flavor development and makes the dough easier to stretch in the pan.
- When ready to bake, remove the dough from the refrigerator and let it sit at room temperature for 30 minutes to 1 hour, until it’s no longer ice cold.
- Preheat your oven to 475°F (245°C). If you have a baking stone, place it on the lowest rack of your oven to preheat as well.
- With oiled fingertips, gently stretch and press the dough to fill the entire baking pan, creating an even thickness. You may need to let it rest for a few minutes if it springs back—just come back to it and stretch again.
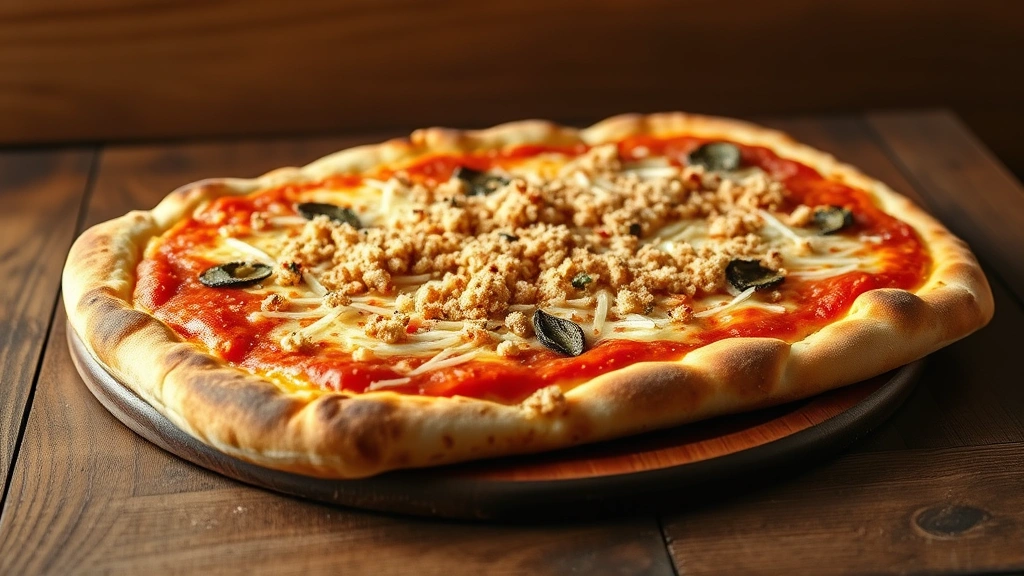
- Add your desired toppings, starting with a light drizzle of olive oil, then sauce, cheese, and any additional toppings. Sicilian pizza is traditionally topped generously but not excessively.
- Bake the pizza on the lowest rack of your oven for 20-25 minutes, until the crust is golden brown and crispy around the edges. The bottom should be deep golden and sound hollow when tapped.
- Remove the pizza from the oven and let it cool on the pan for 3-5 minutes before slicing and serving.

Pro Tips
- HYDRATION RATIO: This dough uses a high hydration ratio of about 70%, which means it will be quite wet and sticky. Don’t be tempted to add extra flour—trust the process. The wetness is what creates those beautiful air pockets and the tender crumb.
- STRETCHES AND FOLDS: If you don’t have a stand mixer, stretches and folds are an excellent way to develop gluten strength in a wet dough. This technique is gentler than traditional kneading and helps maintain the air in the dough.
- FERMENTATION FLEXIBILITY: You can adjust fermentation times based on your kitchen temperature. If your kitchen is warm (above 75°F), reduce times slightly. If it’s cool, extend them. The dough should increase in volume noticeably, not necessarily double.
- COLD FERMENTATION: The 24-72 hour refrigeration is not just for convenience—it’s essential for authentic flavor development and easier handling. The dough develops complex flavors through this long, slow fermentation.
- PAN PREPARATION: Make sure to oil your pan generously. This helps create a crispy, golden crust on the bottom and sides of the pizza. Some traditional recipes even add a drizzle of oil with oregano to the bottom of the pan.
- TOPPING SUGGESTIONS: Classic Sicilian pizza is topped with tomato sauce, onions, breadcrumbs, and anchovies. Modern variations include caciocavallo cheese, roasted vegetables, or meats. Keep toppings relatively light to avoid a soggy bottom.
- OVEN TEMPERATURE: Sicilian pizza bakes at a lower temperature than Neapolitan pizza (475°F vs. 900°F), which allows the thick dough to bake through while developing a beautiful golden crust. If your oven tends to brown things quickly on top, reduce the heat slightly or move the pizza up a rack.
- STORAGE: Unbaked dough can be frozen for up to 3 months. Wrap individual portions in plastic wrap and place in a freezer bag. To use, thaw overnight in the refrigerator before baking.
- BAKED PIZZA STORAGE: Leftover pizza keeps well in the refrigerator for up to 4 days and can be reheated in a 350°F oven for about 10 minutes until warmed through.
- GLUTEN-FREE OPTION: While this recipe is specifically designed for traditional wheat flour, you can experiment with a high-quality gluten-free flour blend that includes xanthan gum. You may need to adjust hydration and fermentation times.