
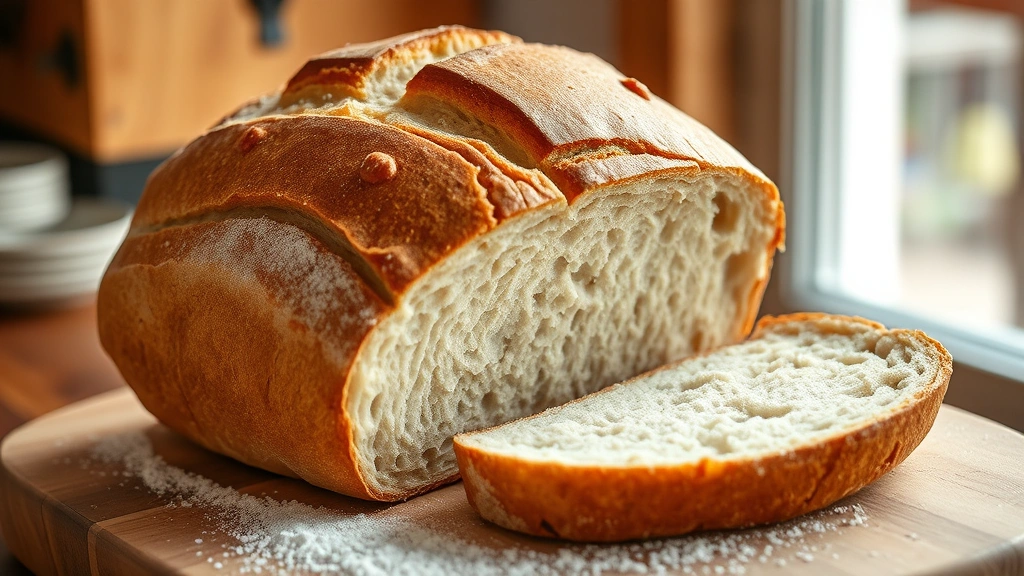
Making sourdough bread in a bread machine is easier than you might think! This foolproof method combines the tangy depth of traditional sourdough with the convenience of your trusty machine. While purists might debate the merits of machine-made loaves, I’m here to tell you that this recipe produces a beautifully crusty exterior and perfectly open crumb structure that rivals bakery results.
The secret to success lies in using an active sourdough starter and understanding your machine’s cycles. Most bread machines have a “dough” or “sourdough” setting that allows for longer fermentation times, which is essential for developing that signature sourdough flavor and texture. If your machine doesn’t have a sourdough setting, don’t worry—we’ll walk you through manual adjustments that work just as well.
What makes this recipe special is the balance between convenience and authenticity. You’ll still get the complex flavors that make sourdough so beloved, with minimal hands-on time. The bread machine handles the heavy lifting—mixing, kneading, and the first rise—while you go about your day. Then comes the fun part: shaping and the final proof, which gives you that gorgeous artisanal appearance.
This recipe is perfect for weeknight dinners when you want fresh, homemade bread without spending hours in the kitchen. Pair it with Quick Tasty Bacon Carbonara for an impressive Italian-inspired meal, or serve alongside Best Heavy Cream Alfredo Sauce for a comforting dinner.
Before you begin, make sure your sourdough starter is active and bubbly—it should roughly double in size within 4-8 hours of feeding. A sluggish starter will result in dense bread, so this step is crucial. I recommend feeding your starter the night before you plan to bake. Room temperature also matters; ideally, you want your kitchen between 70-75°F for optimal fermentation.
The beauty of bread machine baking is that it’s incredibly forgiving once you understand the basics. If your first loaf isn’t perfect, the second will be better. Each machine has its own personality, and you’ll quickly learn how to adjust water content and fermentation times to suit your specific model. Many experienced bakers keep a notebook by their machines to track what works best.
For the best crust, we’ll bake this loaf in a Dutch oven after the bread machine completes its work. This traps steam during the initial bake, creating that coveted crackly exterior that makes sourdough so irresistible. You’ll notice the dramatic “oven spring”—that beautiful expansion that happens in the first 15 minutes of baking—and hear the delightful crackling sounds as the crust sets.
If you’re new to sourdough, this machine method is an excellent introduction before you move on to more advanced techniques like hand-shaping and cold fermentation. It teaches you about timing, fermentation stages, and the importance of a healthy starter without overwhelming you with complexity. Even experienced sourdough makers appreciate having a bread machine option for busy weeks.
For side dishes, consider Easy Pickled Red Onion Recipe to add a bright, tangy component to your meal, or prepare Delicious Heavy Cream Pasta for a rich, satisfying dinner. You might also enjoy Best Chickpea Salad Recipe as a lighter accompaniment.
For more detailed information on sourdough techniques, check out Serious Eats’ sourdough starter guide and Bon Appétit’s sourdough bread recipe. The New York Times’ Tartine sourdough recipe offers excellent professional insights, while Serious Eats’ comprehensive sourdough guide covers everything from starter creation to troubleshooting.
Ingredients
- 1 cup (240 ml) active sourdough starter, fed 4-8 hours prior
- 1 cup (240 ml) warm water (75-80°F)
- 3 cups (360 g) bread flour
- 1½ teaspoons (9 g) salt
- ½ teaspoon (2.5 g) instant yeast (optional, helps if starter is weak)
- 1 tablespoon (12 g) sugar (optional, helps activate starter)
Instructions
- Check that your sourdough starter is active and bubbly—it should have risen significantly since feeding. If it’s sluggish, feed it again and wait 2-4 hours before proceeding.
- Pour the warm water into your bread machine pan first, followed by the active sourdough starter.
- Add the bread flour directly into the pan, ensuring it covers the water completely. This prevents the starter from drying out during the mixing stage.
- Sprinkle the salt into one corner of the flour (keeping it away from the starter initially, as salt can inhibit fermentation if in direct contact).
- If using instant yeast and sugar, sprinkle these into separate corners of the pan to distribute evenly.
- Insert the pan into your bread machine and select the “Dough” or “Sourdough” cycle. This typically runs 2-3 hours and includes mixing, kneading, and a long first rise.
- Once the cycle completes, remove the dough from the machine. It should be soft, slightly sticky, and have a pleasant sour aroma.
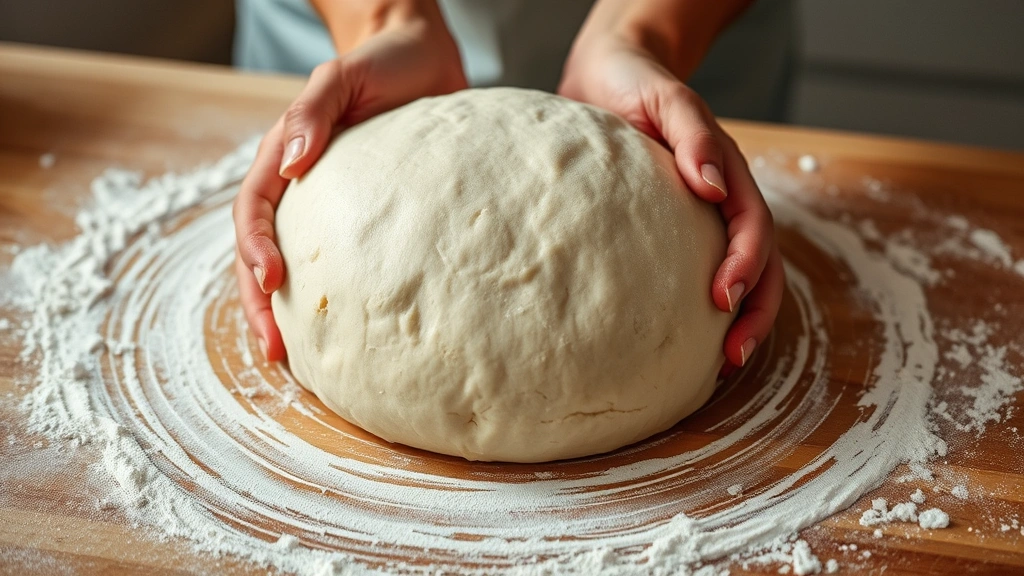
- Turn the dough out onto a lightly floured work surface and gently pre-shape it into a round by folding the edges toward the center and rotating it several times.
- Let the dough rest for 20-30 minutes at room temperature (this is called the bench rest and helps the gluten relax).
- Shape the dough into a boule (round loaf) or batard (oval loaf) using proper sourdough shaping techniques—tension is key for a good crumb structure.
- Place the shaped dough seam-side up into a proofing basket (banneton) or a bowl lined with a well-floured kitchen towel.
- Cover loosely with plastic wrap and let proof at room temperature for 2-4 hours, or until the dough springs back slowly when poked (not immediately, but not completely).
- About 30 minutes before baking, preheat your oven to 500°F with a Dutch oven inside.
- Once the oven and Dutch oven are fully preheated, carefully remove the hot Dutch oven using oven mitts.
- Quickly turn the proofed dough out onto parchment paper and score the top with a sharp bread lame or knife, making a ½-inch deep cut at a 30-45 degree angle.
- Transfer the dough (still on parchment) into the hot Dutch oven and cover with the lid.
- Reduce oven temperature to 450°F and bake covered for 20 minutes to trap steam.
- Remove the Dutch oven lid carefully (watch for steam!) and bake for an additional 15-20 minutes until the crust is deep golden brown.
- Remove the bread from the Dutch oven and transfer to a wire cooling rack.
- Allow the bread to cool completely (at least 1 hour) before slicing. This allows the crumb structure to set properly.
Pro Tips
- **Starter Maintenance**: Keep your sourdough starter healthy by feeding it regularly—typically once or twice daily at room temperature, or once weekly if refrigerated. A strong, active starter is the foundation of excellent sourdough bread.
- **Water Temperature**: Warm water (75-80°F) is crucial because it activates the starter and helps initiate fermentation. Water that’s too hot will kill the beneficial bacteria; too cold will slow fermentation.
- **Machine Variations**: Different bread machines have different cycle lengths and temperatures. If your machine has a “sourdough” cycle, use it. If not, the “dough” cycle works well. Some machines have cycles as short as 90 minutes; others run 3+ hours. Adjust proofing time accordingly.
- **Flour Selection**: Bread flour (12-14% protein) is ideal because it develops strong gluten networks, creating that beautiful open crumb. All-purpose flour (10-12% protein) works but may produce slightly denser results.
- **Salt Timing**: Never mix salt directly with your starter, as salt inhibits yeast activity. Always place it in a separate corner of the pan, or add it after mixing begins.
- **Optional Instant Yeast**: While not necessary (your starter provides all the leavening), a small amount of instant yeast (½ teaspoon) can help if your starter is weak or the environment is particularly cold.
- **Proofing Tests**: Use the “poke test” to determine when your dough is ready to bake. Press your finger gently into the shaped dough. If it springs back slowly and leaves a slight indent, it’s perfectly proofed. If it springs back immediately, it needs more time. If it doesn’t spring back at all, it’s over-proofed.
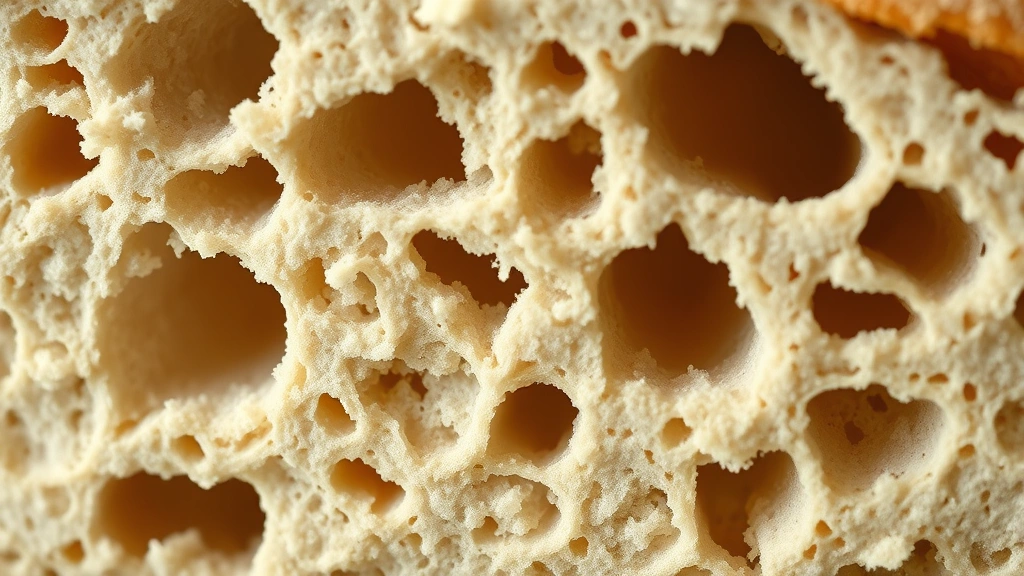
- **Over-Proofing**: Over-proofed dough will spread sideways rather than up, resulting in a flat loaf with dense crumb. Under-proofed dough will have a tight, closed crumb structure. Finding the sweet spot takes practice.
- **Dutch Oven Essential**: The Dutch oven is crucial for creating steam, which allows the crust to expand before setting. Without it, your bread will have a pale, tough crust. If you don’t have a Dutch oven, you can place a baking stone on a lower rack and create steam by pouring hot water into a pan on the floor of your oven, though results won’t be quite as dramatic.
- **Scoring Technique**: Score the dough at a 30-45 degree angle, ¼ to ½ inch deep. This controls where the bread expands (called “ear” in sourdough terminology) and creates that beautiful artisanal appearance.
- **Cooling Completely**: Resist the urge to slice warm bread. The interior is still setting and will be gummy if cut too early. Cool for at least 1 hour, preferably 2-3 hours.
- **Storage**: Store cooled bread in a paper bag at room temperature for 2-3 days. For longer storage, wrap tightly and freeze for up to 3 months. Toast from frozen for fresh-baked flavor anytime.
- **Troubleshooting Dense Crumb**: This usually indicates weak starter, insufficient fermentation time, or too much salt. Ensure your starter is active and bubbly before using.