
Sous vide chicken is the ultimate game-changer for achieving perfectly juicy, tender chicken every single time. This foolproof method uses precise temperature control to cook chicken to exact doneness while locking in all those delicious juices that typically escape with traditional cooking methods. Whether you’re meal prepping for the week or impressing dinner guests, sous vide chicken is incredibly versatile and pairs beautifully with countless sides and sauces.
The beauty of sous vide cooking lies in its consistency. Unlike pan-searing or roasting, where timing and heat management can be tricky, sous vide removes the guesswork entirely. Your chicken will never be dry, overcooked, or rubbery again. The meat stays incredibly moist because it cooks in its own juices at a controlled temperature, never exceeding your target doneness level.
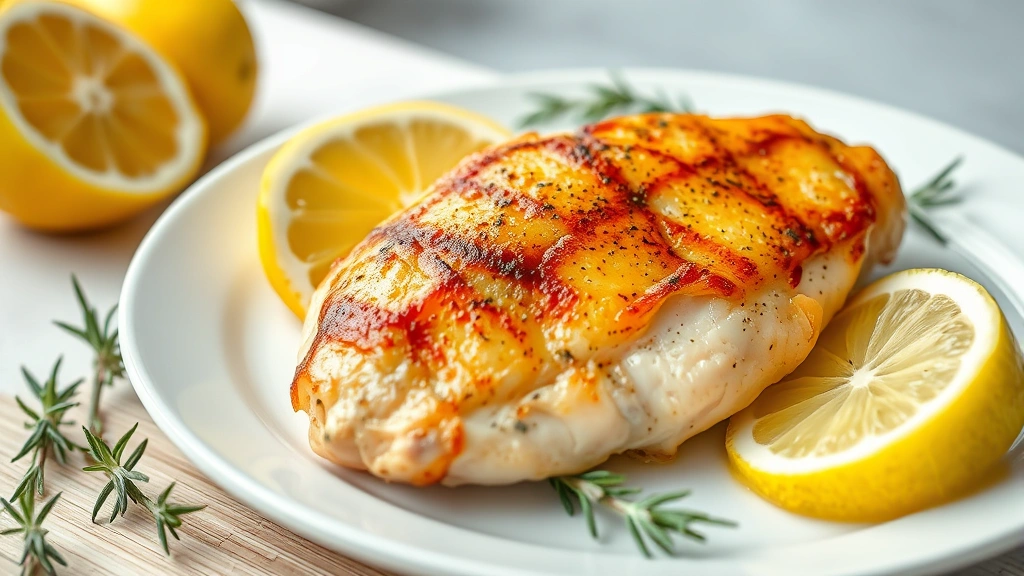
Once your chicken finishes its water bath, you’ll want to give it a quick sear in a hot skillet to develop a gorgeous golden crust and add textural contrast. This combination of tender, juicy interior and crispy exterior is absolutely restaurant-quality. Pair your sous vide chicken with sides like our best heavy cream Alfredo sauce, creamy pasta, or fresh salads featuring easy pickled red onions for brightness.
For those new to sous vide cooking, don’t worry—this method is actually simpler than traditional cooking once you understand the basics. You’ll need a sous vide immersion circulator (also called a precision cooker), a large pot or container, and a vacuum sealer or resealable bags. The process is straightforward: season your chicken, seal it, submerge it in precisely heated water, and let time and temperature do all the work.
I love preparing sous vide chicken because it’s perfect for meal prep. Cook a batch on Sunday, and you’ll have tender, flavorful chicken ready to use throughout the week in salads, grain bowls, sandwiches, or with chickpea salad for protein-packed lunches. The chicken stays fresh in the refrigerator for up to four days, making it an incredibly convenient option for busy weeknights.
Temperature is absolutely critical for sous vide success. For chicken breasts, I recommend 165°F (74°C) for juicy, tender results—this is the USDA safe temperature for poultry. Some cooks prefer 158-160°F for an even more tender texture, but 165°F is the safest option and still produces incredibly moist chicken. Chicken thighs can handle slightly lower temperatures due to their higher fat content, but I keep mine at 165°F as well for consistency and safety.
Timing matters too, though sous vide’s beauty is that your chicken won’t overcook even if you leave it in the water bath longer than intended. For boneless, skinless chicken breasts that are about one inch thick, I cook for 1 to 1.5 hours. Thicker pieces may need up to 2 hours. Bone-in, skin-on chicken requires slightly longer cooking times, typically 1.5 to 2 hours, to ensure the interior reaches the target temperature.
The finishing sear is what transforms your sous vide chicken from good to restaurant-quality. After removing the chicken from the water bath, pat it completely dry with paper towels—moisture is the enemy of browning. Heat a cast-iron skillet or stainless steel pan over high heat until it’s smoking hot, then add a small amount of oil with a high smoke point like avocado or vegetable oil. Sear the chicken for just 60-90 seconds per side until golden brown and crispy. This quick sear develops a flavorful crust without overcooking the perfectly cooked interior.
Seasoning your chicken is where you can get creative and add incredible flavor. Beyond basic salt and pepper, consider garlic powder, dried herbs like thyme or rosemary, smoked paprika, or even Asian-inspired seasonings like ginger and soy sauce. You can also add aromatics like fresh garlic cloves, lemon slices, or herb sprigs directly into the vacuum bag for infused flavor. The sealed environment allows these flavors to really penetrate the meat beautifully.
For maximum flavor development, season your chicken generously and let it sit for at least 30 minutes before bagging and cooking. This allows the salt to penetrate the meat and enhance its natural juiciness through a process called osmosis. It’s the same technique used in restaurants to achieve superior results.
While chicken breasts are the most popular choice for sous vide, don’t overlook chicken thighs. They’re more forgiving, incredibly flavorful, and actually harder to overcook thanks to their higher fat content. Thighs stay juicier longer and develop deeper, more complex flavors. Try shishito peppers alongside sous vide thighs for a restaurant-worthy side.
I absolutely love pairing sous vide chicken with creamy sauces. The mild, delicate chicken serves as a perfect canvas for rich accompaniments. Bacon carbonara is divine with sous vide chicken, or try it with heavy cream pasta for an elegant weeknight dinner.
Once you master basic sous vide chicken, you’ll find endless possibilities. Try different marinades, experiment with flavor infusions, or use your perfectly cooked chicken in grain bowls, salads, tacos, or sandwiches. The consistency and quality you’ll achieve with sous vide cooking will absolutely change how you prepare chicken forever. Welcome to the sous vide revolution—your dinner guests will be seriously impressed!
Ingredients
- 4 boneless, skinless chicken breasts (about 8 ounces each, approximately 1 inch thick)
- 2 teaspoons kosher salt
- 1 teaspoon freshly ground black pepper
- 1 teaspoon garlic powder
- 1 teaspoon dried thyme or Italian seasoning
- 1/2 teaspoon smoked paprika (optional but recommended)
- 4 cloves garlic, lightly crushed
- 4 sprigs fresh rosemary or thyme (optional)
- 2 tablespoons olive oil or avocado oil for searing
- 2 tablespoons butter for finishing (optional)
- Fresh lemon wedges for serving
- Additional fresh herbs for garnish
Instructions
- Prepare your sous vide setup by filling a large pot or container with water and placing your immersion circulator in it. Set the temperature to 165°F (74°C) and allow the water to come to temperature—this typically takes 10-15 minutes.
- While the water heats, pat the chicken breasts dry with paper towels and arrange them on a clean cutting board.
- In a small bowl, combine kosher salt, black pepper, garlic powder, dried thyme, and smoked paprika, mixing well to distribute seasonings evenly.
- Generously season both sides of each chicken breast with the spice mixture, using about half a teaspoon per side. Distribute the seasonings evenly and press them gently into the meat so they adhere.
- If using fresh garlic and herb sprigs, divide them among four gallon-sized resealable freezer bags or vacuum-seal bags, placing one crushed garlic clove and one herb sprig in each bag.
- Place one seasoned chicken breast into each bag, laying it flat and ensuring it’s arranged in a single layer with no folding or bunching.
- If using resealable bags, employ the water displacement method: slowly lower the filled bag into the preheated water bath with the opening above the water line, allowing water pressure to displace air from the bag. Seal the bag just as it reaches the water, leaving minimal air inside. Alternatively, use a vacuum sealer following manufacturer instructions for best results.
- Once all four chicken breasts are sealed and submerged in the precisely heated water, note the time. The chicken will cook for 1 to 1.5 hours depending on thickness—aim for the middle of this range for optimal results.
- While the chicken cooks, prepare a shallow dish with ice water nearby and gather your searing supplies. You’ll want a cast-iron skillet or stainless steel pan, high-heat oil, butter, paper towels, and tongs ready to go.
- When the cooking time is complete, carefully remove the bags from the water bath using tongs and transfer them to the ice bath for exactly 2-3 minutes. This stops the cooking process and prepares the chicken for searing.
- Remove each chicken breast from its bag, letting excess liquid drip back into the bag before transferring to a plate lined with paper towels.
- Pat each chicken breast completely dry on all sides using fresh paper towels—this is crucial for achieving a proper golden crust during searing.
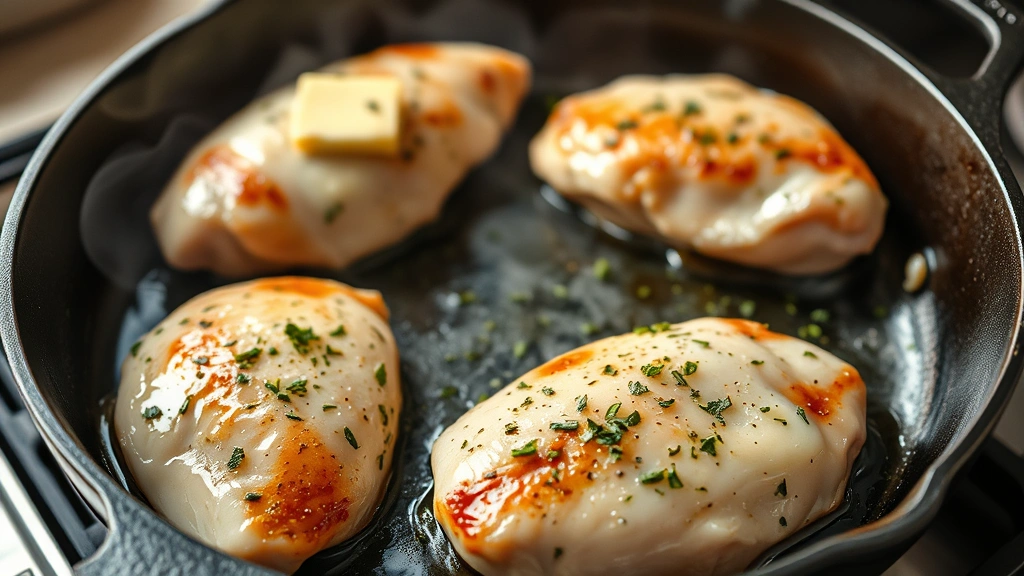
- Place your cast-iron skillet or stainless steel pan over high heat and allow it to preheat for 2-3 minutes until it’s smoking hot, indicating it has reached proper searing temperature.
- Add about 1.5 teaspoons of olive oil or avocado oil to the hot skillet, tilting the pan to coat the bottom evenly. The oil should shimmer and smoke almost immediately.
- Carefully place one dried chicken breast into the hot skillet, laying it away from you to avoid splattering. Resist the urge to move it—let it sit undisturbed for 60 seconds to develop a proper golden crust.
- Using tongs, flip the chicken breast and sear the other side for another 60 seconds until golden brown and crispy.
- Transfer the seared chicken breast to a clean plate and repeat the searing process with the remaining three chicken breasts, adding a small amount of additional oil between batches if needed.
- Once all chicken is seared, reduce heat to medium-low and return all four breasts to the skillet, adding a tablespoon of butter and letting it melt over the chicken. This adds richness and flavor to the final dish.
- Tilt the pan and baste each chicken breast with the melted butter and pan juices for about 30 seconds, then transfer to a serving plate.
- Garnish generously with fresh herbs, cracked black pepper, and fresh lemon wedges, allowing diners to customize their chicken with bright citrus if desired.
Pro Tips
- Temperature precision is absolutely critical for sous vide success—invest in a reliable immersion circulator with accurate temperature control. Budget models work great; expensive ones don’t necessarily cook better.
- The water displacement method works perfectly well for resealable bags, though vacuum sealing removes more air and is slightly more efficient. Both methods produce excellent results.
- Chicken breasts vary in thickness—if yours are significantly thicker than one inch, add 15-20 minutes to cooking time. Thinner breasts may cook in as little as 45 minutes.
- Don’t skip the ice bath step! It halts the cooking process immediately, preventing carryover cooking that could make your chicken slightly overdone.
- For meal prep, cook your chicken, cool it completely, and store in airtight containers in the refrigerator for up to four days. You can reheat gently in a 300°F oven or serve cold in salads.
- Chicken thighs require the same temperature (165°F) but may need an additional 15-30 minutes cooking time due to their thicker shape and higher fat content. Bone-in chicken also requires extended cooking.
- Save the cooking liquid from your bags! It makes an incredible light broth or sauce base with exceptional chicken flavor.
- For extra flavor, marinate chicken in your preferred flavors for 2-4 hours before bagging. Citrus, soy sauce, and herbs all work beautifully in the sealed environment.
- The sear is non-negotiable for restaurant-quality results—it develops the Maillard reaction that creates complex, savory flavors and adds crucial textural contrast.
- If you don’t have an immersion circulator, this recipe cannot be replicated accurately with traditional cooking methods. Invest in one; they’re affordable and will revolutionize your cooking.
- For safety, always confirm your chicken reaches 165°F internally with a meat thermometer before consuming, though sous vide at this temperature guarantees this result.
Pingback: How to Make the Best Steelhead Trout Recipe (So Delicious!) – Simple Recipe Finder