

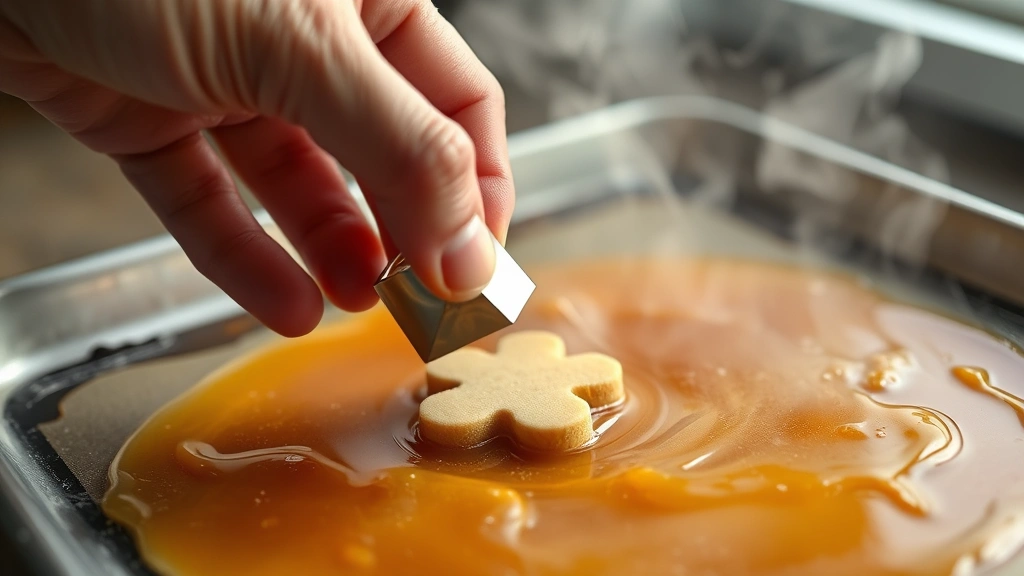
If you’ve watched Squid Game, you know exactly what I’m talking about—those gorgeous honeycomb cookies with the stamped shapes are absolutely mesmerizing! This recipe recreates that iconic dessert from the show, and let me tell you, it’s easier than you’d think. These delicate, crispy cookies with their beautiful sugar coating are the perfect conversation starter and will transport you right back to that tense scene.
The magic of these cookies lies in the simplicity of the ingredients and the technique. You’re basically making a caramelized sugar base, mixing it with baking soda to create that beautiful honeycomb texture, then carefully shaping it before it hardens. It sounds intimidating, but once you’ve made one batch, you’ll be a pro. The key is working quickly and having all your tools ready before you start cooking the sugar.
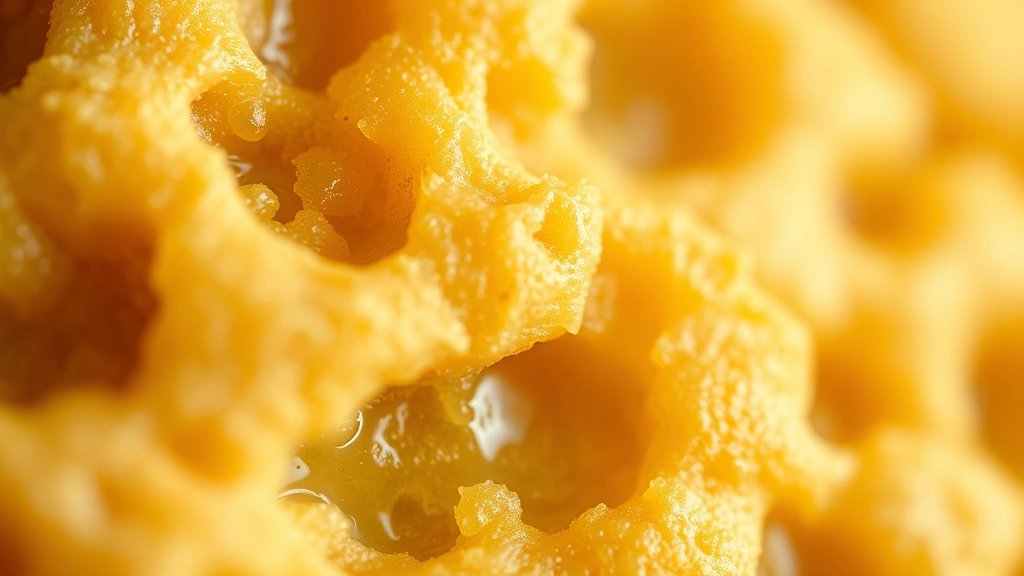
What I love most about this recipe is that it requires minimal equipment—just a few basic kitchen staples—and yet produces restaurant-quality results. The cookies are light, airy, and have that perfect combination of crunch and sweetness. Plus, there’s something so satisfying about pressing that cookie cutter into the warm candy and watching it take shape.
These make incredible gifts, stunning party favors, or just a fun weekend project. You can even customize the shapes using different cookie cutters if you want to put your own spin on the classic. Serve them with tea or coffee for an elegant treat, or package them up with some pretty ribbon for a gift that’ll impress literally everyone.
For more creative dessert inspiration, check out our collection of elegant recipes. And if you’re looking for other fun Asian-inspired treats, our dessert guides have tons of options. You might also enjoy exploring other trending recipes that have taken social media by storm.
For detailed candy-making techniques, I recommend checking out Serious Eats’ candy guide and Bon Appétit’s confection tips for additional inspiration and troubleshooting help.
Ingredients
- 1 cup granulated sugar
- 1/3 cup light corn syrup
- 1/4 cup water
- 1/4 teaspoon salt
- 1/2 teaspoon vanilla extract
- 1 1/2 teaspoons baking soda
- Powdered sugar for dusting (optional)
- Non-stick cooking spray or butter for greasing
Instructions
- Prepare your workspace by lining a baking sheet with parchment paper and lightly spraying it with non-stick cooking spray. Have your cookie cutters (circle, triangle, or star shapes) ready and also lightly spray them. Keep a damp kitchen towel nearby to help with handling.
- In a heavy-bottomed saucepan, combine the granulated sugar, light corn syrup, and water. Stir gently over medium heat until the sugar dissolves completely, about 3-4 minutes. Do not stir once the mixture comes to a boil—this can cause crystallization.
- Increase the heat to medium-high and allow the mixture to boil without stirring. Insert a candy thermometer and watch carefully. The mixture will gradually change color from clear to light amber to deeper amber. This process takes about 8-10 minutes depending on your stove.
- When the temperature reaches 300-310°F (hard crack stage), immediately remove the pan from heat. The color should be a medium amber—not too light or too dark. Quickly add the salt and vanilla extract, stirring gently to combine.
- Working very quickly before the mixture hardens, add the baking soda all at once and stir vigorously for about 15-20 seconds. The mixture will foam up dramatically as the baking soda reacts—this is exactly what you want! This creates the honeycomb texture.
- Pour the foamy mixture immediately onto the prepared baking sheet, spreading it gently with a lightly greased spatula. Work fast because it hardens quickly. Try to create an even layer about 1/4 to 1/2 inch thick.
- While the candy is still warm but beginning to set (after about 30 seconds to 1 minute), quickly press your cookie cutters firmly into the surface to create shapes. If the candy is too soft, wait a few more seconds; if it’s too hard, it will crack when you cut.
- Carefully remove the cookie cutters and gently press any broken pieces back together. Allow the entire sheet to cool completely at room temperature for at least 10-15 minutes before handling.
- Once completely cooled and hardened, carefully break the cookies apart along the cut lines. If they’re stuck together, use a small knife to gently separate them.
- Store the cookies in an airtight container with parchment paper between layers. They’ll stay fresh and crispy for up to 5 days. Dust with powdered sugar just before serving for that extra special presentation.
Pro Tips
WORKING SPEED: Once you add the baking soda, you have a very small window of time to work with. Have everything prepped and within arm’s reach before you start cooking the sugar. Consider doing a practice run with the cookie cutters on a piece of parchment to know exactly where you’ll press.
ALTITUDE ADJUSTMENTS: If you live at high altitude, your candy may need to cook to a slightly higher temperature. Start checking at 305°F and adjust based on your results.
HUMIDITY MATTERS: These cookies are sensitive to moisture. Make them on a dry day if possible, and store them in an airtight container to prevent them from getting sticky. If they do get soft, you can recrisp them in a 275°F oven for 5 minutes.
CUSTOMIZATION IDEAS: Use any shapes you like! Triangle, circle, and star cutters all work beautifully. You can also make one large sheet and break it into irregular pieces for a more rustic look.
TROUBLESHOOTING: If your mixture crystallizes (becomes grainy), start over—don’t try to salvage it. If the baking soda doesn’t foam properly, your baking soda may be too old. If cookies are too hard and brittle, your temperature went too high; try 305°F next time. If they’re chewy, you didn’t reach high enough temperature.
DOUBLE BATCH: This recipe doubles easily if you want to make extras for gifting. Just use a larger saucepan and watch the temperature carefully as it may take a bit longer to reach hard crack stage.