
There’s something absolutely magical about homemade peanut butter fudge that just melts on your tongue! This easy peanut butter fudge recipe has been a cherished favorite in my kitchen for years, and I’m thrilled to share it with you today. What makes this version so special is the perfect balance of creamy peanut butter, rich chocolate, and just the right amount of sweetness—it’s pure indulgence in every bite.
I first discovered this recipe during a particularly stressful week when I desperately needed something comforting and delicious. My grandmother always said that homemade fudge was the ultimate expression of love in candy form, and honestly, I couldn’t agree more. Unlike store-bought versions that often contain mysterious ingredients and preservatives, this homemade version lets you control exactly what goes into your treats. The best part? You don’t need any fancy equipment or culinary degree to make it!
This peanut butter fudge comes together in just minutes, making it perfect for last-minute gifts, holiday parties, or simply satisfying those sweet cravings. The recipe uses simple pantry staples that most of us already have on hand: creamy peanut butter, butter, powdered sugar, and chocolate for coating. The texture is incredibly smooth and creamy, with that classic melt-in-your-mouth quality that reminds me of the fudge my mom made during the holidays.
What I absolutely love about this recipe is how forgiving it is. Whether you’re a seasoned baker or a complete beginner, you’ll have success with this easy peanut butter fudge. The no-bake aspect means there’s no oven temperature to worry about, no timing concerns, and minimal cleanup. Plus, it’s a fantastic activity to do with kids or friends—everyone can participate in the fun of making homemade candy!
The beauty of this recipe lies in its versatility too. You can customize it with different types of chocolate, add a pinch of sea salt for a sweet and salty combination, or even swirl in some complementary flavors to make it truly your own. I’ve made variations with white chocolate, dark chocolate, and even milk chocolate, and each version is absolutely delicious.
The real secret to the tastiest peanut butter fudge is using quality ingredients and not skipping any steps. Taking time to let the mixture set properly ensures you get that perfect fudgy texture. I recommend using natural peanut butter if possible, as it provides a deeper, more authentic peanut flavor compared to the heavily processed versions.
Whether you’re planning to enjoy this treat yourself or package it up as a thoughtful homemade gift, this easy peanut butter fudge recipe will not disappoint. Your family and friends will be amazed when you tell them you made it from scratch! Let me walk you through each step so you can create candy shop-quality fudge right in your own kitchen. Trust me, once you make this, you’ll never look at store-bought fudge the same way again.
For more inspiration with creative recipes, check out this delicious heavy cream pasta recipe or explore easy chicken alfredo options. You might also enjoy making pickled red onions as an accompaniment to savory dishes, or trying shishito peppers for a fun appetizer.
Ingredients
- 1 cup creamy peanut butter (natural or conventional)
- ½ cup unsalted butter
- 2 cups powdered sugar, sifted
- ¼ teaspoon sea salt
- 1 teaspoon vanilla extract
- 2 cups semi-sweet or dark chocolate chips
- 2 tablespoons coconut oil or vegetable oil
- Optional: ¼ teaspoon fleur de sel for topping
Instructions
- Line an 8×8 inch baking pan with parchment paper, leaving a slight overhang on the sides for easy removal later.
- In a medium saucepan over low heat, combine the peanut butter and unsalted butter, stirring frequently until completely melted and smooth.
- Remove from heat and add the sifted powdered sugar, sea salt, and vanilla extract, stirring until the mixture is well combined and smooth.
- Pour the peanut butter mixture into the prepared baking pan and use a spatula to spread it evenly into the corners, creating an even layer.
- Place the pan in the refrigerator and allow the peanut butter layer to chill for at least 1 hour until it’s firm to the touch.
- Once the peanut butter layer is firm, remove the pan from the refrigerator and prepare the chocolate coating.
- In a microwave-safe bowl, combine the chocolate chips and coconut oil, heating in 30-second intervals and stirring between each interval until completely melted and smooth.
- Alternatively, use the double boiler method: place chocolate chips in a heatproof bowl over a pot of simmering water, stirring until melted.
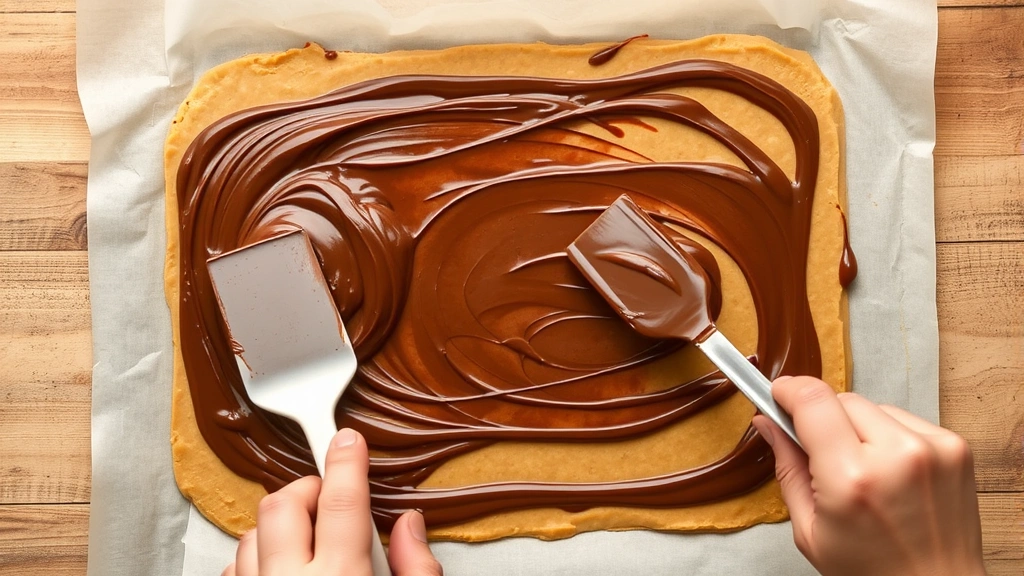
- Pour the melted chocolate over the chilled peanut butter layer, spreading it evenly with a spatula to cover all edges.
- If desired, sprinkle the fleur de sel or additional sea salt over the chocolate while it’s still warm for a sweet and salty flavor combination.
- Return the pan to the refrigerator and chill for at least 1 hour until the chocolate is completely set and firm.
- Remove the fudge from the pan by lifting the parchment paper overhang, then place on a cutting board.
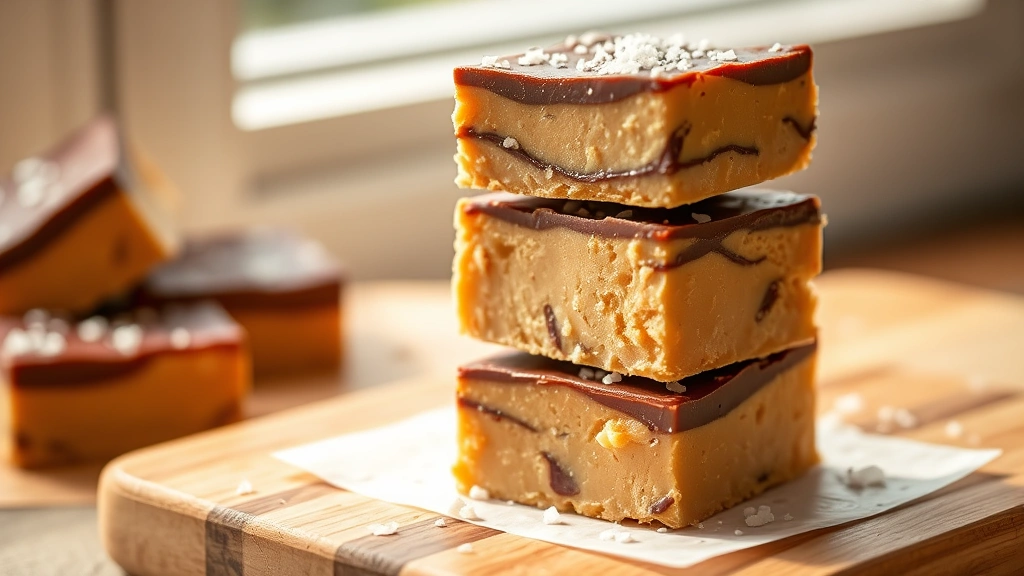
- Using a sharp knife dipped in hot water and wiped clean between cuts, slice the fudge into 1-inch squares or desired size pieces.
- Store the peanut butter fudge in an airtight container in the refrigerator for up to 2 weeks, or freeze for up to 1 month for longer storage.
Pro Tips
Chocolate Selection: Both semi-sweet and dark chocolate work beautifully for this recipe. Milk chocolate can be used if you prefer a sweeter finish. Avoid using chocolate chips labeled as ‘coating chocolate’ as they contain wax and won’t have the same rich flavor.
Setting Time is Important: Don’t rush the chilling process. Properly set fudge will have the perfect texture and will slice cleanly. If your kitchen is particularly warm, extend the chilling time accordingly.
Cutting Tips: Dip your knife in hot water and wipe it clean between each cut for the neatest presentation. Some people prefer to let the fudge sit at room temperature for 10-15 minutes before cutting for easier slicing.
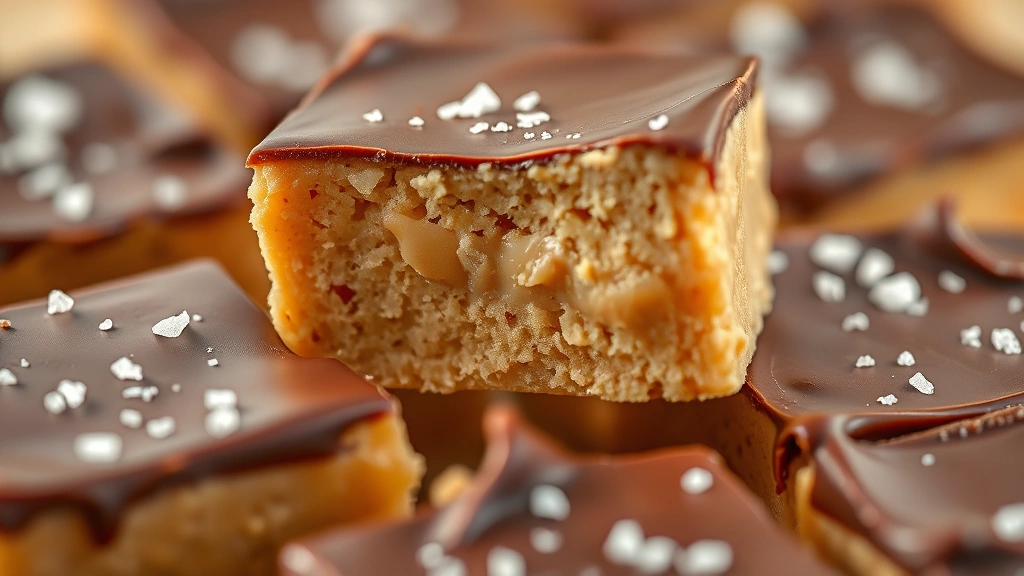
Salt Factor: The sea salt topping is optional but highly recommended. It enhances the peanut butter flavor and creates that beloved sweet and salty combination. Use fleur de sel or a finishing salt rather than regular table salt.
Storage Solutions: Keep fudge in the refrigerator for best results and to maintain the proper texture. Room temperature storage may cause the fudge to become too soft. Properly stored fudge lasts up to 2 weeks in the refrigerator or 1 month in the freezer.
Customization Ideas: Add crushed pretzels to the peanut butter layer for texture, drizzle caramel over the chocolate layer, or sprinkle chopped peanuts on top before the chocolate sets.
Gift Packaging: Layer fudge pieces between parchment paper in a decorative box for beautiful homemade gifts. These make excellent holiday presents and are always appreciated.
Double Batch: This recipe doubles easily if you need more fudge. Use a 9×13 inch pan and increase all ingredients by 1.5 times for thinner pieces or keep a 8×8 for thicker fudge.
Temperature Sensitivity: This fudge is temperature-sensitive, so avoid making it on particularly hot days. Air conditioning in your kitchen will help ensure the best results.