
Listen, friends, I’m going to let you in on a little secret that has absolutely transformed my baking life: Pillsbury pie crusts are the ultimate game-changer for busy home bakers who still want to serve stunning, homemade-tasting desserts. I know what you’re thinking – isn’t using a store-bought crust cheating? Absolutely not! Sometimes the smartest thing we can do in the kitchen is work smarter, not harder, and that’s exactly what these convenient little rounds of dough allow us to do.
I’ve been baking pies for years, and while I do love a good from-scratch adventure, there are so many moments in life when you need a beautiful dessert on the table without spending hours in the kitchen. Whether you’re hosting a last-minute dinner party, bringing a dish to pass to a friend’s gathering, or simply craving a slice of pie on a Tuesday evening, Pillsbury pie crusts are your trusty companion. They’re pre-rolled, perfectly sized, and ready to fill with whatever your heart desires.
What I absolutely love about using Pillsbury crusts is that they free up mental energy and time so you can focus on creating an incredible filling. You can make a rich and creamy custard, a perfectly spiced apple filling, a decadent chocolate ganache, or even a savory vegetable medley. The crust becomes a beautiful vessel for your culinary creativity rather than a source of stress and frustration.
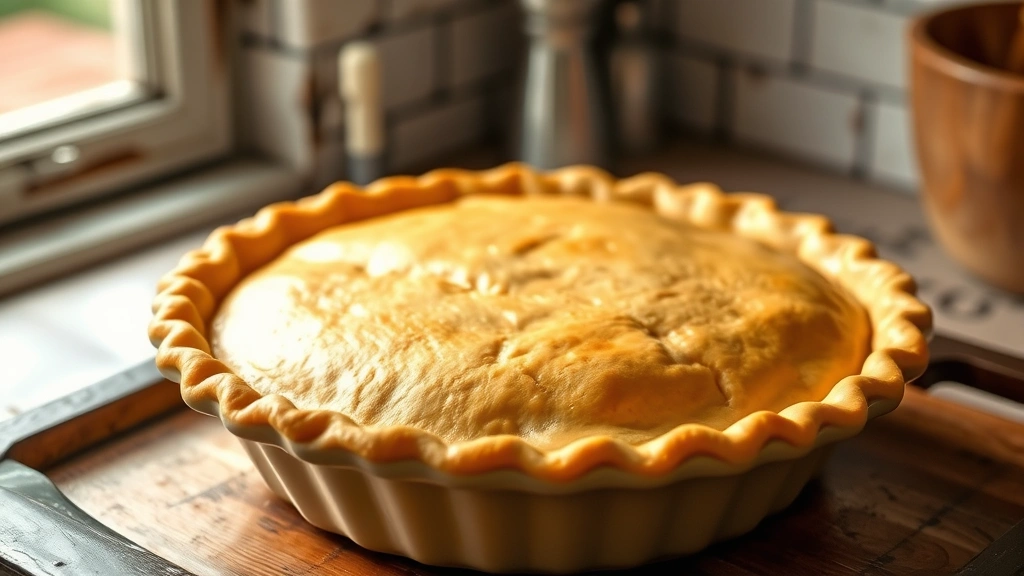
I’ve tested these crusts in countless applications, from classic fruit pies to elegant tarts, and I’m consistently impressed by their quality. The buttery flavor is genuine, the texture is tender and flaky when properly prepared, and they bake up to a gorgeous golden brown that looks absolutely professional. Your guests will genuinely believe you spent hours preparing everything from scratch – and honestly, you don’t owe them any different explanation!
In this guide, I’m sharing my favorite tips and tricks for using Pillsbury pie crusts to create show-stopping desserts. We’ll talk about how to prevent a soggy bottom crust, how to achieve that perfect golden edge, and how to customize these crusts to match your specific dessert vision. I’m also including several filling ideas that pair beautifully with these versatile crusts, along with creative topping suggestions that will elevate your pie from ordinary to extraordinary.
One of my favorite secrets is brushing the crust with an egg wash before baking – it creates that beautiful glossy finish and helps any toppings adhere perfectly. I also love adding a sprinkle of cinnamon sugar, turbinado sugar, or even everything bagel seasoning depending on what filling I’m using. These little touches make such a difference in the final presentation and show that you’ve put thought and care into your dessert.
The beauty of working with pre-made crusts is that you can make multiple pies without feeling overwhelmed. Double batch of filling? Make two pies! Want to try different flavor variations? Grab a few crusts and experiment. This approach has made me a more adventurous baker because I’m not intimidated by the crust-making process – I can focus entirely on developing and perfecting my fillings.
I also appreciate how these crusts perform in different baking scenarios. Whether you’re blind-baking for a cream pie, par-baking before adding a wet filling, or going straight into a full bake with your filling, Pillsbury crusts handle it all with grace. They don’t shrink excessively, they brown evenly, and they maintain their structure throughout the baking process. That’s honestly impressive for a product that costs just a couple of dollars.
For those times when you want to add a special touch, consider brushing melted butter on the crust before baking, or topping it with complementary flavor elements that enhance your specific filling. A drizzle of caramel, a scatter of chocolate chips, or a sprinkle of sea salt can all elevate the finished pie significantly.
Whether you’re an experienced baker looking to streamline your process or a beginner who wants to create beautiful desserts without the intimidation factor, Pillsbury pie crusts are genuinely worth incorporating into your baking rotation. They’re reliable, versatile, and they deliver consistent results every single time. Let’s talk about how to make the most of them!
Ingredients
- 1 Pillsbury pie crust (or 2 for a double-crust pie), thawed according to package directions
- 1 egg, beaten (for egg wash)
- 1 tablespoon water
- 2 tablespoons granulated sugar
- 1 teaspoon ground cinnamon (optional, for cinnamon sugar topping)
- 1/4 teaspoon sea salt
- 2 tablespoons unsalted butter, melted
- Your choice of pie filling (such as fresh fruit, custard, or cream)
Instructions
- Remove your Pillsbury pie crust from the refrigerator and allow it to sit at room temperature for about 5-10 minutes. This makes it easier to work with and less likely to crack or tear.
- Preheat your oven to 425°F (220°C). If you’re making a single-crust pie, position your oven rack to the lower third of the oven for better browning of the bottom crust.
- Carefully unroll the thawed pie crust and place it in your pie dish, allowing it to settle naturally into the bottom and sides. Don’t stretch it too aggressively – let gravity and gentle pressing do most of the work.
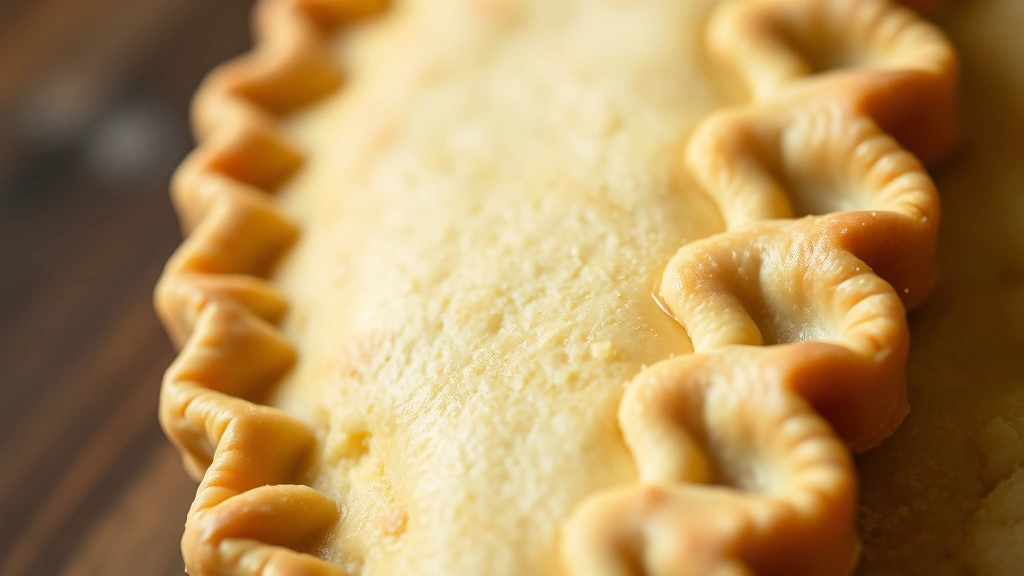
- Trim any excess dough from the edges, leaving about a 1-inch overhang. This overhang will be folded under and crimped to create a beautiful finished edge.
- Fold the overhang under itself to create a thick border, then crimp the edges using your thumb and forefinger or the tines of a fork for a more decorative look.
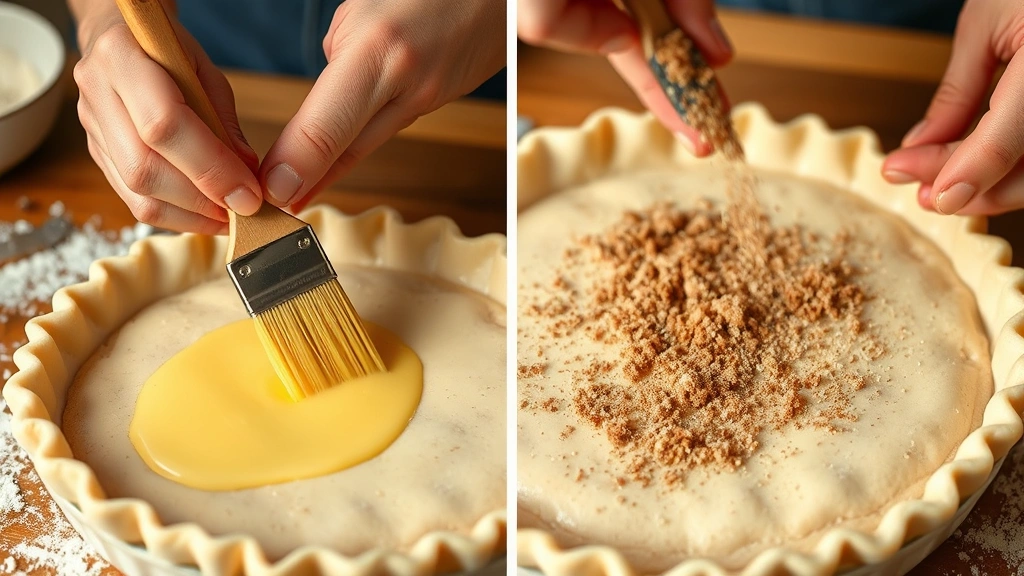
- In a small bowl, whisk together the beaten egg and water to create your egg wash. This will give your crust a beautiful golden, glossy finish.
- Brush the egg wash evenly over the entire crust, being careful to coat the edges and crimped border thoroughly.
- In another small bowl, combine the granulated sugar and ground cinnamon (if using). Sprinkle this mixture evenly over the egg-washed crust for added flavor and visual appeal.
- If you’re blind-baking (pre-baking before adding filling), prick the bottom of the crust several times with a fork to prevent puffing, line it with parchment paper, and fill with pie weights or dried beans.
- Place your prepared pie crust in the preheated oven. If blind-baking, bake for 10-12 minutes, then remove the weights and parchment and bake for another 3-5 minutes until lightly golden.
- If you’re adding your filling directly to the unbaked crust, add your prepared filling at this point and follow your specific recipe’s baking instructions.
- For a fully baked single-crust pie, bake at 425°F for 12-15 minutes until the crust is golden brown, then reduce heat to 350°F and continue baking according to your filling recipe.
- If the crust edges begin browning too quickly, cover them with aluminum foil or a pie shield to prevent over-browning while the filling finishes cooking.
- Once your pie is finished baking, remove it from the oven and allow it to cool on a wire rack. This cooling period is crucial – it allows the filling to set and makes slicing much easier.
- For best results, allow your pie to cool completely before slicing. Many pies benefit from several hours of cooling or even refrigeration before serving.
Pro Tips
- Store your Pillsbury pie crusts in the freezer until you’re ready to use them – they keep for several months and are ready to go whenever inspiration strikes
- If your crust develops cracks during thawing or placement, don’t panic! You can seal small cracks by pinching them together gently, or by using a tiny piece of dough pressed into the crack
- For a more professional appearance, consider using a pastry brush specifically for egg wash – it distributes the wash more evenly than a regular brush
- Blind-baking is essential when making cream pies or custard pies where the filling doesn’t bake – it prevents that dreaded soggy bottom crust
- If you prefer a less sweet crust, skip the cinnamon sugar topping and simply brush with melted butter and a light sprinkle of sea salt
- These crusts work beautifully for both sweet and savory applications – try filling them with vegetables, cheese, and herbs for a sophisticated savory pie
- Make sure to place your pie dish on a sturdy baking sheet before putting it in the oven – this catches any drips and makes it easier to move the pie around
- For a double-crust pie, thaw two crusts and follow the same preparation steps, placing one crust in the dish, adding filling, then topping with the second crust
- Don’t skip the cooling period – rushing to slice warm pie often results in filling running everywhere and a messy presentation
- Consider making multiple pies at once and freezing the extras – fully baked pies freeze beautifully for up to three months
- For extra flavor, brush the finished crust with melted butter immediately after removing from the oven, then sprinkle with fleur de sel
- These crusts pair beautifully with savory fillings too, making them incredibly versatile for both sweet and savory applications